Particle Editor Basics
From Mod Wiki
| Revision as of 00:06, 8 January 2009 (edit) Don Reba (Talk | contribs) m (formatting fix) ← Previous diff |
Revision as of 00:13, 8 January 2009 (edit) (undo) Don Reba (Talk | contribs) m (removed numbers from sections) Next diff → |
||
| Line 46: | Line 46: | ||
| # This button adds a new Particle effect to the particle group. | # This button adds a new Particle effect to the particle group. | ||
| - | == | + | ==Particle Groups== |
| [[Image:peb_effectgroup.gif|left|thumb]]{{Clear}} | [[Image:peb_effectgroup.gif|left|thumb]]{{Clear}} | ||
| Line 57: | Line 57: | ||
| # This is the selected Particle Effect. Click this if you want to change it. | # This is the selected Particle Effect. Click this if you want to change it. | ||
| - | == | + | ==Particle Effects== |
| [[Image:peb_effect.gif|left|thumb]]{{Clear}} | [[Image:peb_effect.gif|left|thumb]]{{Clear}} | ||
| Line 69: | Line 69: | ||
| # Sprite shader. This is the type of shader used, there are several diffrent ones you can use for diffrent purpuses. | # Sprite shader. This is the type of shader used, there are several diffrent ones you can use for diffrent purpuses. | ||
| - | == | + | ==Particle Effect Actions== |
| [[Image:peb_actions.gif|left|thumb]]{{Clear}} | [[Image:peb_actions.gif|left|thumb]]{{Clear}} | ||
Revision as of 00:13, 8 January 2009
First things first you do this at your own risk. If you need help or have any other comments mail me at [email protected].
This tutorial will cover how you use the particle editor and how to edit particle effects and groups. To complete this tutorial/walkthrough you will need.
- Stalker MP SDK installed
- unpacked Stalker files
- time
Contents |
Setting up
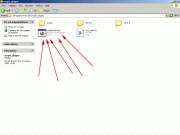
Locate scripts_plugins folder inside X-Ray SDK folder. Run createDiskX.bat Open The new virtual disk through your computer, it's labeled X:.
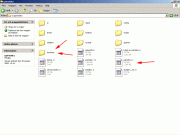
- Open the gamedata folder inside the new virtual disk labeled X:.
- Make a backup of particles.xr.
- Copy particles.xr from the unpacked stalker files and overwrite.
- Copy textures folder from the unpacked stalker files and overwite the files inside.
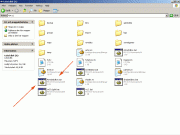
Starting up
Run ParticleEditor.bat inside the X: disk.
Overview
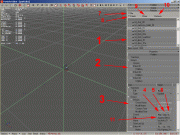
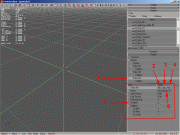
- This is the particle effect and particle group browser. A particle group consists of several particle effects. They are marked with PE for particle effect and PG for particle group. Usually a particle group is used in game, like the muzzleflash that comes out of your weapon or the explosion of a grenade.
- Here you can see the Effects inside a particle group or Actions inside a particle effect.
- Here you have all the properties for particle effects.
- This button plays the particle effect or group. (Hotkey F5).
- This button stops the particle effect or group from emmiting. (Hotkey F6).
- This button stops the particle effect or group from emmiting and removes emitted particles. (Hotkey F7).
- FILE - Includes SAVE - Saves the particle file. Reload - Reloads it. Import/Export is disabled by default.
- CREATE - Here you can Create Particle Effects and groups. They will be created under the selected folder.
- CLONE - Will instantly clone the selected group or effect without confirmation. It will rename it with a diffrent number.
- Remove - Does what it says removes PE's and PG's (I assume you know what a PE and a PG is now.). This one will have a confirmation window before deleting.
- This button adds a new Particle effect to the particle group.
Particle Groups
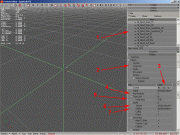
- Here you can select the diffrent effects inside a PG.
- Preview a Effect with this button.
- Select - this button takes you to the selected PE instantly.
- Remove - this button removes the PE. Confirmation window pops up.
- This checkbox tells us if the particle effect is enabled or disabled. You don't need to delete Particle Effects from the group if you dont want to.
- This is the selected Particle Effect. Click this if you want to change it.
Particle Effects
- Yet again the PE and PG broswer (Notice the small PE and PG.).
- Here you can browse the diffrent actions of a Particle Effect.
- Controls - Play (F5). Stop (F6). Hard Stop (F7).
- This is the maximum particles emitted so if you would like more blood to come out you can add a bit to this vaule for example.
- For how long will the particles be emitted. Example if the blood should pour out you can increase this.
- Sprite texture. Here you can change the sprite emitted
- Sprite shader. This is the type of shader used, there are several diffrent ones you can use for diffrent purpuses.
Particle Effect Actions
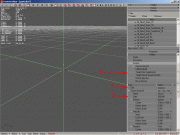
- This button lets you add diffrent actions.
- Here you can see the source of the particle effect, its a good thing to start off with a source it's obvious that you should do that.
- Here you can see all the diffrent actions for this particle effect. See the list underneath.
- Avoid
- Steer particles away from a domain of space.
- Bounce
- Bounce particles off a domain of space.
- Copy VertexB
- Set the secondary position from current position.
- Damping
- Simulate air by slowing down particle velocities.
- Explosion
- An explosion.
- Follow
- Accelerate toward the next particle in the group.
- Gravitate
- Accelerate each particle toward each other.
- Gravity
- Accelerate particles in the given direction.
- Jet
- Accelerate particles that are near the center of the jet.
- Kill Old
- Remove old paticles.
- Match Velocity
- Modify each particle's velocity to be similar to select value.
- Move
- Move particle positions based on velocities.
- Orbit Line
- Accelerate toward the closest point on the given.
- Orbit Point
- Accelerate toward the given center point.
- Random Accel
- ACcelerate particles in random directions.
- Random Displace
- Immediately replace position with a postion from the specified.
- Random Velocity
- Immediately replace velocity with a velocity from the specified.
- Restore
- Over time, restore particles to their secondary positions.
- Scatter
- Scatter particles from center.
- Sink
- Kill particles with positions on wrong side of the specified.
- Sink Velocity
- Kill particles with velocities on wrong side of the specified
- Source
- Add particles in the specified domain. The base of particle effects.
- Speed Limit
- Clamp each particle's speed to the given min and max.
- Target Color
- Change color of all particles toward the specified color.
- Target rotate
- Change rotation of all particles toward the specified rotation.
- Target Size
- Change sizes of all particles toward the specified size.
- Target Velocity
- Change velocity of all particles toward the specified velocity.
- Turbulence
- Turbulence.
- Vortex
- Swirl particles around a vortex.
Well this is it for this basic tutorial/walkthrough hope you picked up something. This tool is very powerful you can almost create anything you want with it. Once you are done editing and want to see the results ingame. Move the particles.xr to the gamedata folder where you have stalker installed then your changes and additions will work. Find any typos, gramatical errors feel free to correct me by email or if you have something good to add.
Stay tuned for Particle Editor Advanced Tutorial where we will go through how to create your own particle effects/groups.
Have fun, Hoogin
