Docs:Adjusting a scene in LevelEditor
From Mod Wiki
| Revision as of 04:08, 31 May 2007 (edit) Zergius (Talk | contribs) ← Previous diff |
Revision as of 10:20, 5 June 2007 (edit) (undo) Smile (Talk | contribs) Next diff → |
||
| Line 1: | Line 1: | ||
| - | == | + | ==Introduction== |
| - | LevelEditor | + | LevelEditor is a linker editor. |
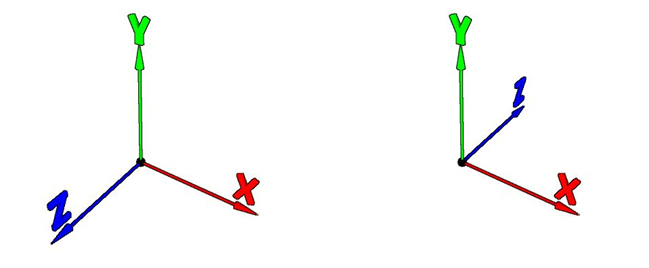
| - | + | Coordinate systems of Maya and LevelEditor are slightly different | |
| - | [[image:Docs_axis.jpg| | + | [[image:Docs_axis.jpg|Left: Maya coordinates, Right: LevelEditor coordinates LevelEditor|center|frame|Left: Maya coordinates, Right: LevelEditor coordinates LevelEditor]] |
| - | == | + | ==Adding textures== |
| ===General issues=== | ===General issues=== | ||
| - | + | The textures added must be formatted to <code>.tga</code> (can contain alpha-channel). The name of the textures are composed with accordance to the following pattern: '''<code>directoryname_texturename</code>''' <br /> | |
| - | ( | + | (when created, the texture user_blablabla.tga will be imported to the folder named user). |
| - | + | When adding a texture with LevelEditor, the LevelEditor performs the following actions: | |
| - | *<code>user_blablabla.tga</code> | + | *Texture <code>user_blablabla.tga</code> is copied into the directory <code>level_editor\rawdata\textures\user\</code> |
| - | * | + | *The description file with <code>user_blablabla.thm</code> extension is created in the directory <code>level_editor\rawdata\textures\user\</code> |
| - | * | + | *The file <code>user_blablabla.dds</code> is created in the directory <code>level_editor\gamedata\textures\user\</code> |
| - | * | + | *The information about the texture <code>user_blablabla.dds</code> is added to the file <code>level_editor\gamedata\textures\textures.ltx</code> |
| - | === | + | ===Necessary actions to add textures=== |
| <div style="text-align:center;"> | <div style="text-align:center;"> | ||
| <flash>file=Docs_basic_01_add_new_texture.swf|width=800|height=619|quality=medium|menu=false</flash> | <flash>file=Docs_basic_01_add_new_texture.swf|width=800|height=619|quality=medium|menu=false</flash> | ||
| </div> | </div> | ||
| - | * | + | *Copy new texture to folder <code>level_editor\import\</code> |
| - | * | + | *Launch LevelEditor |
| *Images -> check new textures | *Images -> check new textures | ||
| - | [[image:Docs_leveleditor_add_new_texture.jpg| | + | [[image:Docs_leveleditor_add_new_texture.jpg|Adding new texture|center|frame|Adding new texture]] |
| - | * | + | *Put the necessary settings |
| - | * | + | *Press OK |
| - | == | + | ==Removing textures== |
| - | * | + | *Launch LevelEditor |
| *Images -> Image Editor | *Images -> Image Editor | ||
| - | * | + | *Select the texture, which need to be removed |
| - | [[image:Docs_leveleditor_del_texture.jpg| | + | [[image:Docs_leveleditor_del_texture.jpg|Removing texture|center|frame|Removing texture]] |
| - | * | + | *Press Remove Texture -> yes -> ok |
| *Images -> Image Editor -> Rebuild Association -> yes -> ok | *Images -> Image Editor -> Rebuild Association -> yes -> ok | ||
| - | == | + | ==Creating a scene== |
| - | === | + | ===Creating a scene=== |
| - | + | To get familiar with the process of scene-building, check the video tutorial. | |
| <div style="text-align:center;"> | <div style="text-align:center;"> | ||
| <flash>file=Docs_basic_04_simple_scene_setup.swf|width=800|height=619|quality=medium|menu=false</flash> | <flash>file=Docs_basic_04_simple_scene_setup.swf|width=800|height=619|quality=medium|menu=false</flash> | ||
| </div> | </div> | ||
| - | === | + | ===Adding objects from LevelEditor's library=== |
| *Edit Mode -> Object ->Select | *Edit Mode -> Object ->Select | ||
| - | * | + | *Select the necessary object. |
| - | [[image: Docs_leveleditor_select_object.jpg| | + | [[image: Docs_leveleditor_select_object.jpg|Selecting object from the library|center|frame|Selecting object from the library]] |
| - | * | + | *Press "Add new object" to add it to the scene. |
| ==Spawns Setup== | ==Spawns Setup== | ||
| ===General issues=== | ===General issues=== | ||
| - | + | There are 3 modes of the Multiplayer gameplay: | |
| - | * | + | *Free for all |
| - | * | + | *Team play (only 2 teams) |
| - | * | + | *Artifact hunt |
| - | + | Maximum number of players - 32. | |
| - | === | + | ===Free for all Setup=== |
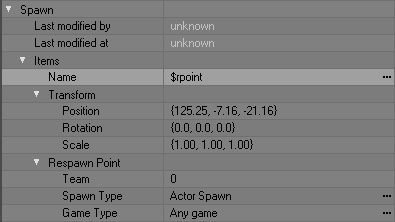
| - | + | Add to the scene the needed amount of '''$rpoint''' <code>(Edit Mode -> Spawn Element -> $rpoint)</code> elements with the basic settings. | |
| - | [[image:Docs_leveleditor_dethmatch.jpg| | + | [[image:Docs_leveleditor_dethmatch.jpg|Basic settings for $rpoint|center|frame|Basic settings for $rpoint]] |
| - | === | + | ===Team play Setup=== |
| - | * | + | *Add to the scene the needed amount of $rpoint (Edit Mode -> Spawn Element -> $rpoint) elements with the basic settings. |
| - | * | + | *In case when it is necessary to create $rpoint, which belongs to one team only, change the parameter <code>Team: 1 or 2</code>, and <code>Game Type: TeamDeathMatch</code> (work only for version 1.003 and higher). In this case all $rpoint with basic settings will serve as spectator place. |
| - | [[image:Docs_leveleditor_teamdethmatch.jpg| | + | [[image:Docs_leveleditor_teamdethmatch.jpg|Team play settings for $rpoint|center|frame|Team play settings for $rpoint]] |
| - | === | + | ===Artifact hunt Setup=== |
| - | ==== | + | ====Creating bases==== |
| - | * | + | *Create two box shapes (<code>Edit Mode -> Shape -> Box</code>) in the places when the opposing bases are going to be located. |
| - | * | + | *Place $team_base (<code>Edit Mode -> Spawn Element -> $team_base</code>) inside each box shape. |
| - | [[image:Docs_leveleditor_teambase.jpg| | + | [[image:Docs_leveleditor_teambase.jpg|Artifact hunt settings for $team_base|center|frame|Artifact hunt settings for $team_base]] |
| - | * | + | *Select $team_base. |
| - | * | + | *Press <code>Commands -> Attach Object</code>… |
| - | * | + | *Select the necessary Shape. |
| - | ==== | + | ====Adding spawn point of team members==== |
| - | * | + | *Add to the scene the needed amount of $rpoint within the limits of box shape of the 1st team with the following settings: |
| - | [[image:Docs_leveleditor_artefacthunt1.jpg| | + | [[image:Docs_leveleditor_artefacthunt1.jpg|Artifact hunt settings for $rpoint (players)|center|frame|Artifact hunt settings for $rpoint (players)]] |
| - | * | + | *Same for the 2nd team, but with changed parameter Team to 2. |
| - | ==== | + | ====Adding team particles (indicate the borders of team base)==== |
| - | * | + | *Add to the scene the needed amount of $rpoint in the limits of box shape of the 1st team with the following settings: |
| - | [[image:Docs_leveleditor_artefacthunt2.jpg| | + | [[image:Docs_leveleditor_artefacthunt2.jpg|Artifact hunt settings for $rpoint (particles)|center|frame|Artifact hunt settings for $rpoint (particles)]] |
| - | * | + | *Same for the 2nd team, but with changed parameter Team to 2. |
| - | ==== | + | ====Add artifacts spawn point==== |
| - | + | Add to the scene the needed amount of $rpoint with the following settings: | |
| - | [[image:Docs_leveleditor_artefacthunt3.jpg| | + | [[image:Docs_leveleditor_artefacthunt3.jpg|Artifact hunt settings for $rpoint (artifacts)|center|frame|Artifact hunt settings for $rpoint (artifacts)]] |
| [[Category:MOD SDK official help|{{PAGENAME}}]] | [[Category:MOD SDK official help|{{PAGENAME}}]] | ||
| - | [[ru:Docs: | + | [[ru:Docs:LevelEditor Scene Setup]] |
Revision as of 10:20, 5 June 2007
Contents |
Introduction
LevelEditor is a linker editor.
Coordinate systems of Maya and LevelEditor are slightly different
Adding textures
General issues
The textures added must be formatted to .tga (can contain alpha-channel). The name of the textures are composed with accordance to the following pattern: directoryname_texturename
(when created, the texture user_blablabla.tga will be imported to the folder named user).
When adding a texture with LevelEditor, the LevelEditor performs the following actions:
- Texture
user_blablabla.tgais copied into the directorylevel_editor\rawdata\textures\user\ - The description file with
user_blablabla.thmextension is created in the directorylevel_editor\rawdata\textures\user\ - The file
user_blablabla.ddsis created in the directorylevel_editor\gamedata\textures\user\ - The information about the texture
user_blablabla.ddsis added to the filelevel_editor\gamedata\textures\textures.ltx
Necessary actions to add textures
- Copy new texture to folder
level_editor\import\ - Launch LevelEditor
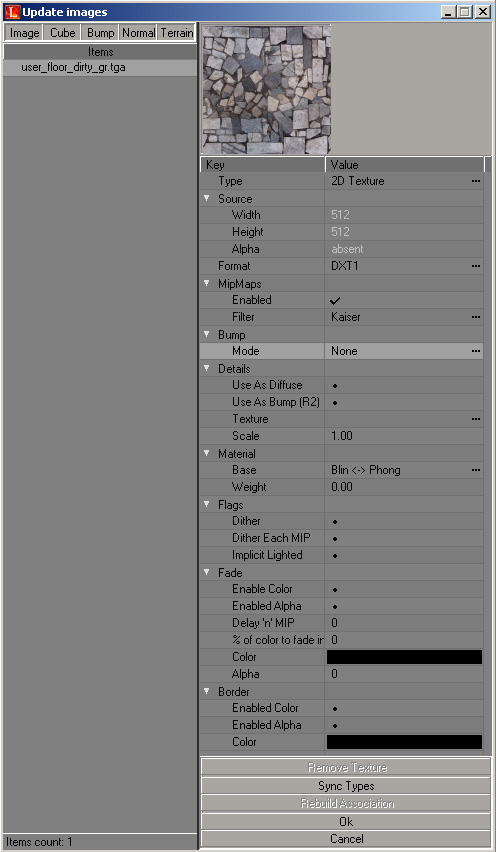
- Images -> check new textures
- Put the necessary settings
- Press OK
Removing textures
- Launch LevelEditor
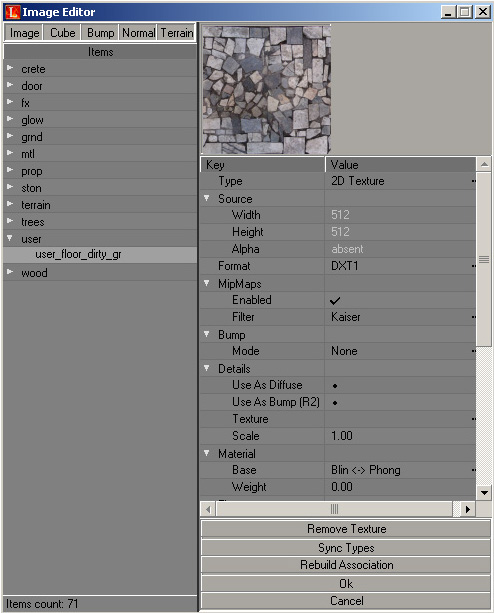
- Images -> Image Editor
- Select the texture, which need to be removed
- Press Remove Texture -> yes -> ok
- Images -> Image Editor -> Rebuild Association -> yes -> ok
Creating a scene
Creating a scene
To get familiar with the process of scene-building, check the video tutorial.
Adding objects from LevelEditor's library
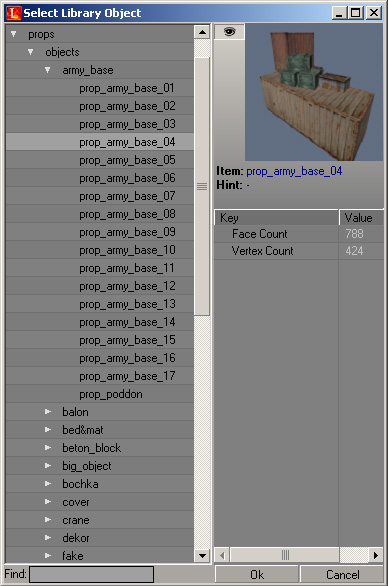
- Edit Mode -> Object ->Select
- Select the necessary object.
- Press "Add new object" to add it to the scene.
Spawns Setup
General issues
There are 3 modes of the Multiplayer gameplay:
- Free for all
- Team play (only 2 teams)
- Artifact hunt
Maximum number of players - 32.
Free for all Setup
Add to the scene the needed amount of $rpoint (Edit Mode -> Spawn Element -> $rpoint) elements with the basic settings.
Team play Setup
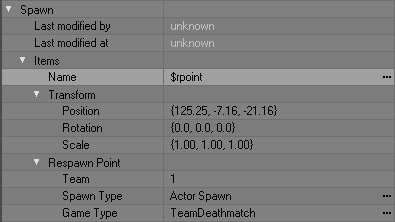
- Add to the scene the needed amount of $rpoint (Edit Mode -> Spawn Element -> $rpoint) elements with the basic settings.
- In case when it is necessary to create $rpoint, which belongs to one team only, change the parameter
Team: 1 or 2, andGame Type: TeamDeathMatch(work only for version 1.003 and higher). In this case all $rpoint with basic settings will serve as spectator place.
Artifact hunt Setup
Creating bases
- Create two box shapes (
Edit Mode -> Shape -> Box) in the places when the opposing bases are going to be located. - Place $team_base (
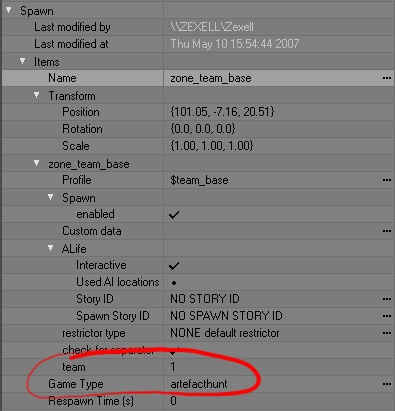
Edit Mode -> Spawn Element -> $team_base) inside each box shape.
- Select $team_base.
- Press
Commands -> Attach Object… - Select the necessary Shape.
Adding spawn point of team members
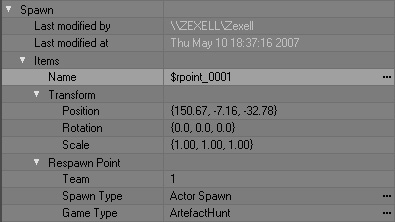
- Add to the scene the needed amount of $rpoint within the limits of box shape of the 1st team with the following settings:
- Same for the 2nd team, but with changed parameter Team to 2.
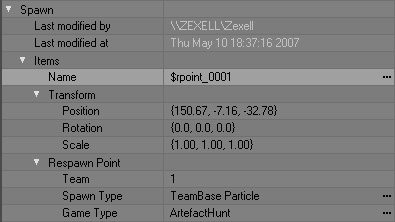
Adding team particles (indicate the borders of team base)
- Add to the scene the needed amount of $rpoint in the limits of box shape of the 1st team with the following settings:
- Same for the 2nd team, but with changed parameter Team to 2.
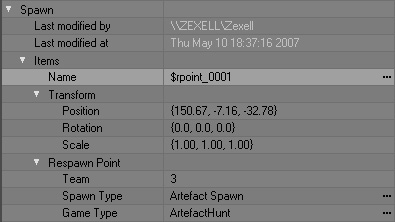
Add artifacts spawn point
Add to the scene the needed amount of $rpoint with the following settings:
