Model export tutorial
From Mod Wiki
| Revision as of 18:48, 5 February 2008 (edit) Bac9-flcl (Talk | contribs) (New page: ==Создание моделей и добавление в игру== Итак, для работы нам понадобятся следующие инструменты: * '''Autode...) ← Previous diff |
Current revision (19:15, 5 February 2008) (edit) (undo) Bac9-flcl (Talk | contribs) |
||
| (7 intermediate revisions not shown.) | |||
| Line 1: | Line 1: | ||
| - | + | For a work with the model, we need following software: | |
| - | + | * '''Autodesk 3D Studio Max 6''', '''7''' or '''8''' (on another versions work of export plug-in may appear buggy and unstable) | |
| - | + | * '''3DS Max STALKER Plug-In''' for export to object format (.obj) | |
| - | * '''Autodesk 3D Studio Max | + | |
| - | * '''3DS Max STALKER Plug-In''' | + | |
| * '''S.T.A.L.K.E.R. SDK''' | * '''S.T.A.L.K.E.R. SDK''' | ||
| - | + | For the textures we'll need: | |
| * '''Adobe Photoshop''' | * '''Adobe Photoshop''' | ||
| - | * '''DDS- | + | * '''DDS Plug-in for Photoshop''' by '''nVidia''' |
| - | + | Let's start. For example, we'll try to export a simple primitive like cube. | |
| - | '''1)''' | + | '''1)''' Open '''3DS Max''' and create the cube. |
| - | [[ | + | [[Image:Model_Tutorial_1.jpg]] |
| - | '''2)''' | + | '''2)''' Open '''Material Editor''' («М» button by default), choose material type by pressing on '''Standart''' (1) button. Choose '''S.T.A.L.K.E.R. Mtl''' (2) in the opened list. Then, in '''Blinn Basic Parameters''' section, click on the small button near '''Diffuse''' (3), then, in opened list choose '''Bitmap''' (4), and select suitable texture from '''gamedata''' folder of our '''SDK'''. For example, I used '''gamedata\textures\wpn\wpn_pkm_lenta.dds'''. |
| - | + | Then, we need to apply our texture to cube and configure it's visual settings: in '''Material Editor''', or, if the object is detailed, - with '''Unwrap UVW''' tool. | |
| - | [[ | + | [[Image:Model_Tutorial_2.jpg]] |
| - | '''3)''' | + | '''3)''' After texturing, we need to change size of our object to give it a normal looking ingame (not a skyscraper, eh). To make it easier, I imported one of the game models to the scene, for example, AK74. Now, let's work with bones. |
| - | + | Choose '''Create -> Systems -> Bones''' and create a pair of bones inside our box (placed as on the picture). Name the first bone (for example, "kost"). Leave second, it's not needed yet. | |
| - | [[ | + | [[Image:Model_Tutorial_3.jpg]] |
| - | '''4)''' | + | '''4)''' Select our box. Open '''Modify''' section, and add '''Physique''' (1) modifier to it. In modifier settings, choose '''Attach''' to '''Node''' (2), then click on our bone named "kost", and choose '''Riquid''' (3) in opened list. Then, click '''Initialize''' (4). |
| - | [[ | + | [[Image:Model_Tutorial_4.jpg]] |
| - | '''5)''' | + | '''5)''' Next, in '''Physique''' level of '''Detail''' section, change '''Skin Update''' parameter to '''Rigid''', then, in '''Physique''' modifier tree choose the vertexes of our object with pressed '''Select''' button. Choose vertex type: '''Rigid''' (4), press '''Assign to Link''' (5), and click on our bone. |
| - | [[ | + | [[Image:Model_Tutorial_5.jpg]] |
| - | '''6)''' | + | '''6)''' Now, all ready for export to object format (.obj), which is understood by '''Actor Editor''' from '''SDK'''. Open '''Utilites''' section, press '''S.T.A.L.K.E.R. Export''' (1) button (this button will present only if the plugin was configured right). Select our box and choose '''Export Skin'''. Save. Look at the log - are there no errors? |
| - | [[ | + | [[Image:Model_Tutorial_6.jpg]] |
| - | '''7)''' | + | '''7)''' Open '''Actor Editor''' from '''SDK''', and load our saved model. We'll see something like that: |
| - | [[ | + | [[Image:Model_Tutorial_7.jpg]] |
| - | '''8)''' | + | '''8)''' On '''Object Items''' panel, we see our object settings (we're interested only in '''Surfaces''' and '''Bones'''). Materials and shaders are set in '''Surfaces'''. Open '''Surfaces''' list, choose '''01-Default''' (I forgot to name that material during my work in 3DSMax), and set the following parameters: |
| * '''Shader:''' models/model | * '''Shader:''' models/model | ||
| Line 60: | Line 58: | ||
| - | [[ | + | [[Image:Model_Tutorial_8.jpg]] |
| - | + | ||
| - | + | ||
| - | + | ||
| - | + | ||
| - | + | '''9)''' Now, we need to configure our bone. Open the Bones list, and choose our "kost". Click on the '''All''' button near the '''Generate Shape''', configure the weight with '''Mass''' parameter. You can set the material with '''Game Material''' parameter (I didn't touch that, just keep '''default_object''') then choose '''bound_box''' type with pressing the '''Type''' button. I used the '''Box'''. You can rotate it, change it size, etc. | |
| - | + | [[Image:Model_Tutorial_9.jpg]] | |
| - | + | '''10)''' Now, when all parameters are set, export our box to .ogf-file with '''File -> Export''', and use our model as the visual for something (for example, bolt). Then walk and throw these things to NPC :) | |
| - | + | ==Authors== | |
| - | ''' | + | '''Article created by''' [[Участник:tambovski|tambovski]]<br> |
| + | [http://www.amkmod.ru AMK Mod Team] | ||
| [[Category:Articles]] | [[Category:Articles]] | ||
Current revision
For a work with the model, we need following software:
- Autodesk 3D Studio Max 6, 7 or 8 (on another versions work of export plug-in may appear buggy and unstable)
- 3DS Max STALKER Plug-In for export to object format (.obj)
- S.T.A.L.K.E.R. SDK
For the textures we'll need:
- Adobe Photoshop
- DDS Plug-in for Photoshop by nVidia
Let's start. For example, we'll try to export a simple primitive like cube.
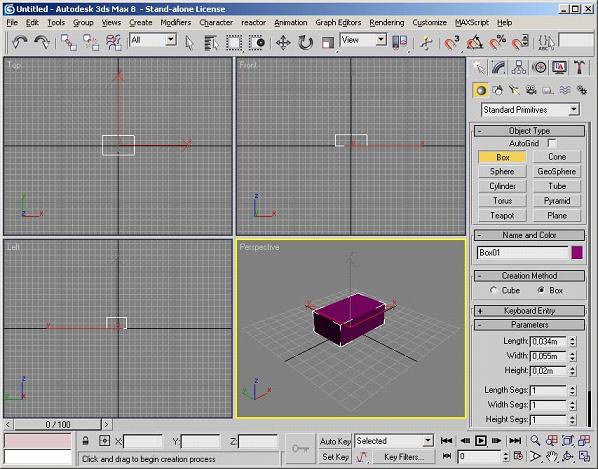
1) Open 3DS Max and create the cube.
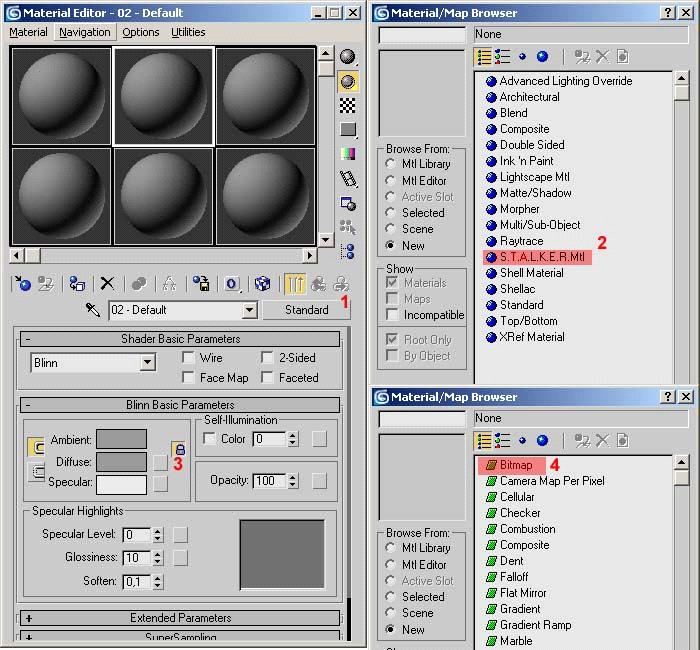
2) Open Material Editor («М» button by default), choose material type by pressing on Standart (1) button. Choose S.T.A.L.K.E.R. Mtl (2) in the opened list. Then, in Blinn Basic Parameters section, click on the small button near Diffuse (3), then, in opened list choose Bitmap (4), and select suitable texture from gamedata folder of our SDK. For example, I used gamedata\textures\wpn\wpn_pkm_lenta.dds.
Then, we need to apply our texture to cube and configure it's visual settings: in Material Editor, or, if the object is detailed, - with Unwrap UVW tool.
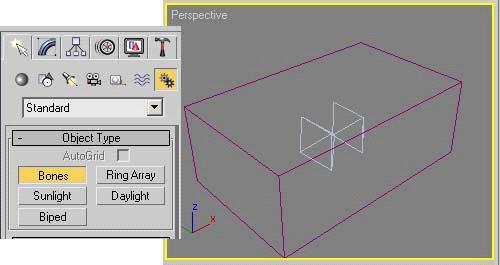
3) After texturing, we need to change size of our object to give it a normal looking ingame (not a skyscraper, eh). To make it easier, I imported one of the game models to the scene, for example, AK74. Now, let's work with bones.
Choose Create -> Systems -> Bones and create a pair of bones inside our box (placed as on the picture). Name the first bone (for example, "kost"). Leave second, it's not needed yet.
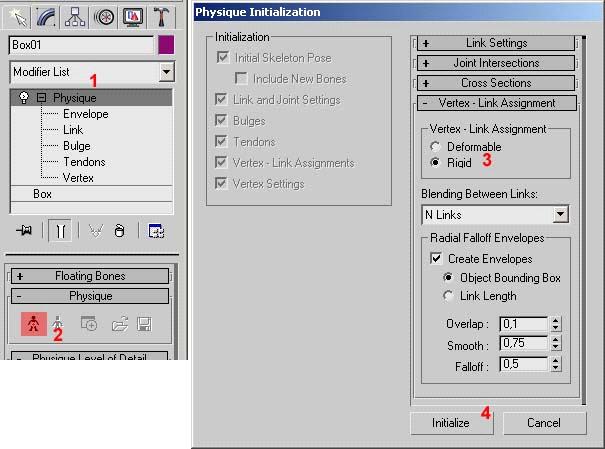
4) Select our box. Open Modify section, and add Physique (1) modifier to it. In modifier settings, choose Attach to Node (2), then click on our bone named "kost", and choose Riquid (3) in opened list. Then, click Initialize (4).
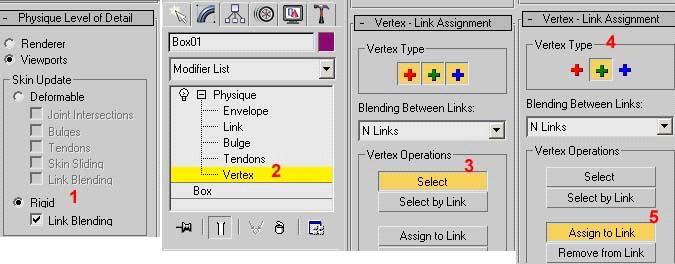
5) Next, in Physique level of Detail section, change Skin Update parameter to Rigid, then, in Physique modifier tree choose the vertexes of our object with pressed Select button. Choose vertex type: Rigid (4), press Assign to Link (5), and click on our bone.
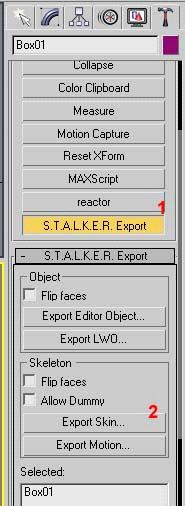
6) Now, all ready for export to object format (.obj), which is understood by Actor Editor from SDK. Open Utilites section, press S.T.A.L.K.E.R. Export (1) button (this button will present only if the plugin was configured right). Select our box and choose Export Skin. Save. Look at the log - are there no errors?
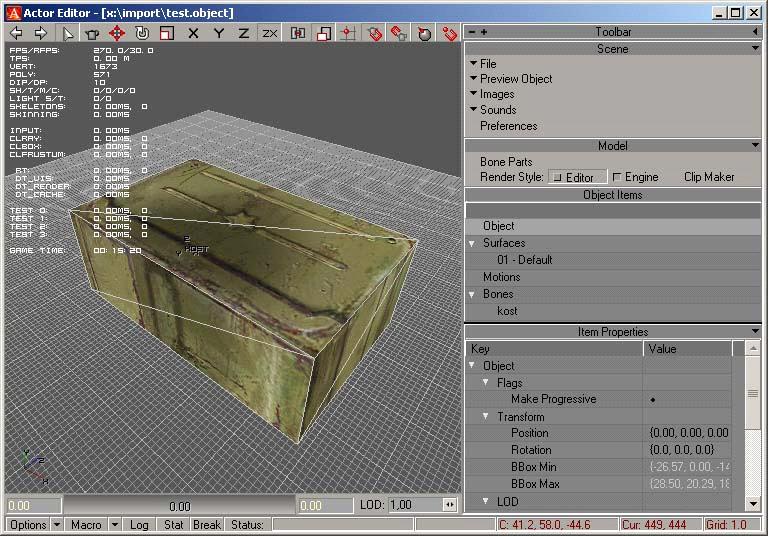
7) Open Actor Editor from SDK, and load our saved model. We'll see something like that:
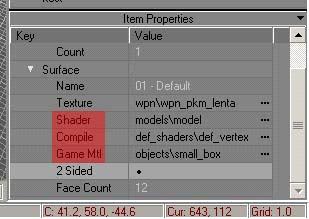
8) On Object Items panel, we see our object settings (we're interested only in Surfaces and Bones). Materials and shaders are set in Surfaces. Open Surfaces list, choose 01-Default (I forgot to name that material during my work in 3DSMax), and set the following parameters:
- Shader: models/model
- Compile: def_shaders/def_vertex
- Game Mtl: objects/small_box
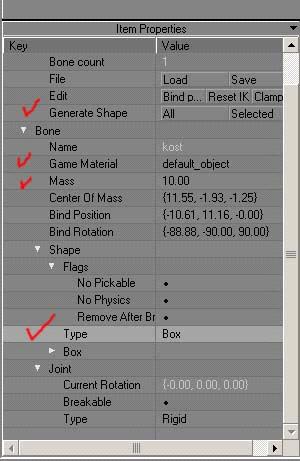
9) Now, we need to configure our bone. Open the Bones list, and choose our "kost". Click on the All button near the Generate Shape, configure the weight with Mass parameter. You can set the material with Game Material parameter (I didn't touch that, just keep default_object) then choose bound_box type with pressing the Type button. I used the Box. You can rotate it, change it size, etc.
10) Now, when all parameters are set, export our box to .ogf-file with File -> Export, and use our model as the visual for something (for example, bolt). Then walk and throw these things to NPC :)
Authors
Article created by tambovski
AMK Mod Team
