Weapon import
From Mod Wiki
| Revision as of 11:15, 20 July 2008 (edit) Don Reba (Talk | contribs) (New page: This tutorial will run you through the basics of getting your own modelled weapon into STALKER. This tutorial will only teach you how to get a basic BOX weapon into the game and do some r...) ← Previous diff |
Revision as of 11:17, 20 July 2008 (edit) (undo) Don Reba (Talk | contribs) (removed unnecessary right alignment from an image) Next diff → |
||
| Line 229: | Line 229: | ||
| # You will notice once you do this, the mesh will go black, go to the propertiesfor the tool (you should know how to do this by now). Now move the camera over to the thumb. | # You will notice once you do this, the mesh will go black, go to the propertiesfor the tool (you should know how to do this by now). Now move the camera over to the thumb. | ||
| # Go to the next page to see what does what in the properties: | # Go to the next page to see what does what in the properties: | ||
| - | # [[Image:wi25.png | + | # [[Image:wi25.png]]{{Clear}} |
| ## Brush size | ## Brush size | ||
| ## This is where youselect which bone youwant to paint theweight for. | ## This is where youselect which bone youwant to paint theweight for. | ||
Revision as of 11:17, 20 July 2008
This tutorial will run you through the basics of getting your own modelled weapon into STALKER.
This tutorial will only teach you how to get a basic BOX weapon into the game and do some really basic animation work using Maya.
This tutorial is not to try and make the biggest baddest mother of all weapons...(although you have to admit...a box IS a pretty badass weapon to use.) It is simply to teach the basics so that you can allwork from the basics.
The way I see it, if you can do this tutorial (which I hope you can, by the end of going through it), then you'll be able to expand upon your weapon creation abilities and even item creation, vehicle creationand actor creation.
They all work off the same principles, just some like the actor creation is more advanced.
- Note that this tutorial is also available as a formatted PDF.
What you will need
- Maya 8.5 (If you can get it working on Maya 2008 or an earlier version, great stuff, but Irecommend Maya 8.5 for the purpose of this tutorial)
- XRay plugins (Instructions are written later on how to install these)
- STALKER MP SDK 0.4 (STALKER MP SDK 0.4 )
- STEAM installed (This is for the SMD plugins for Maya)
- OGF2SMD (OGF2SMD )
- STALKER gamedata extractor (GAMEDATA EXTRACTOR)
- Latest version of STALKER (Currently 1.006, but I am using 1.004)
And of course you also need some patience and focus. I will try and make this process as easy aspossible.
Preparation
Make sure that you have all of the above files on your computer before you continue.
You must have a patched version of STALKER and you need to have extracted your gamedata files toa gamedata folder.
Using the database extractor
This is NOT HARD but I thought I'd throw in some instructions anyway.
- Once you've downloaded the extractor, place it inside of the directory:
C:\Program Files\THQ\S.T.A.L.K.E.R. - Shadow of Chernobyl - Make a new folder called "gamedata"
- Open the extractor program "Unpacker.exe" and select the gamedata.db file you want toextract and click open.
- A new window will pop up asking you where you want to extract the file to. Extract the file toyour new gamedata folder:
C:\Program Files\THQ\S.T.A.L.K.E.R. - Shadow of Chernobyl\gamedata - Repeat until all gamedata files are extracted (this can take about 10-15mins)
- Open the file called "fsgame.ltx" in the same S.T.A.L.K.E.R -Shadow of Chernobyl folder.
- Find the line that says $game_data$ = false| true| $fs_root$| gamedata and change the"false" to "true" so it looks like this:
$game_data$ = true| true| $fs_root$| gamedata
That is all you need to do.
Why you need steam
You need steam so that you can get the plugins to Import SMD files. It is not necessary, but it canhelp. (!!!WARNING!!!: After just finding out that all my measurements were messed up in Mayaafter installing these plugins. For example, I have a level that is 1.2kmx1.5km, and it has no problemswith the settings being in meters, HOWEVER, if I create a new scene with the same settings andimport my level, it is more like 1.2mX1.5m rather than km, and the view plane is messed upcompletely.
I DO NOT recommend installing the plugins, however, I have left these instructions here IF you wantto take the risk.
You need to go to STEAM and download the "source SDK" and Install it.
Then you need to double click on Source SDK so that it copies the files to your HDD.
This is all you need to do in STEAM, so you can now close STEAM.
Installing the plugins
- Go to C:\Program Files\Valve\Steam\SteamApps\'''username'''\sourcesdk\maya\4.5
- Copy the folders "Prefs" and "scripts" to:
C:\My Documents\maya\8.5 - Then go to:
C:\ProgramFiles\Valve\Steam\SteamApps\natace25\sourcesdk\maya\7.0\modules\vstSmd
IO
- Copy the "scripts" folder to:
C:\My Documents\maya\8.5 - Copy the "icons" folder to:
C:\My Documents\maya\8.5\prefs - Copy the "plug-ins" folder to:
C:\Program Files\Autodesk\Maya8.5\bin
The plugins for the smd importer/exporter are now installed.
Xray material plugins
You will need the XRay Mtl plugins so that you can export your models to a format that is recognizedby the XRay Engine.
(NOTE: You need to have downloaded the SDK before beginning this step)
Installing the plugins
- Go to where you installed the SDK, and find the scripts_plugins folder:
C:\Program Files\X-Ray SDK\scripts_plugins - Copy the folder called "scripts" into:
C:\My Documents\maya\8.5 - Now go to the folder called "ver-8.5" and copy the "plug-ins" folder and the "BugTrap.dll" file to:
C:\Program Files\Autodesk\Maya8.5\bin - Inside of the "scripts_plugins" folder in the SDK folder, go to the bat file "createDiskX.bat" and view it with notepad:
You will notice that there are 2 lines similar to this:
"C:\WINDOWS\system32\subst.exe" X: /C
"C:\WINDOWS\system32\subst.exe" X: "C:\Program Files\X-Ray SDK\level_editor" - IF your SDK is installed on another drive, for example mine is installed on my D drive, youneed to change the text to this:
"C:\WINDOWS\system32\subst.exe" X: /D
"C:\WINDOWS\system32\subst.exe" X: "D:\Program Files\X-Ray SDK\level_editor" - Save the bat file.
- Copy the "Xray_path.ltx" file to:
C:\Program Files\Autodesk\Maya8.5\bin
Your scripts are now set up.
Creating a batch file so for the X drive and Maya to open at the same time
This is to save you the trouble of having to map the X drive every time you restart your computer anduse maya. (this was suggested by Micheal Anderson "Mikool" back when I wrote the level creationtutorial).
This bat file will Map the X drive for you and also Start Maya at the same time to save you the hassleof manually starting the X drive from the start menu before opening Maya.
Simply create a new text document and copy and paste these lines into it:
@ECHO OFF
ECHO "run creatediskx"
PAUSE
call "D:\Program Files\X-Ray SDK\scripts_plugins\createDiskX.bat"
ECHO "load maya"
PAUSE
start maya.exe
Save the bat file and make a shortcut to use this instead of Maya 8.5, you will need to press a keywhen the file prompts you to.
Loading the Scripts inside of Maya 8.5
Now it's time to open up Maya and load the XRay material plugin to see if it is installed correctly.
- Now that Maya 8.5 is open, go to "windows > settings/preferences > preferences"
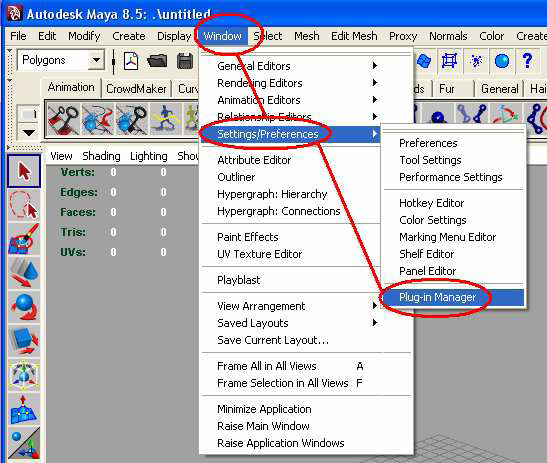
- A new window will appear, Scroll down the bottom and tick the tick boxes as shown in picture below:


(If you get an error when trying to tick the boxes, I have had this problem, and you will need try and reinstall the plugins again, as far as I know that was what fixed my problem).
Now Maya 8.5 has all the necessary plugins and you can begin!
But first, lets just close down Maya for the time being.
Using OGF2SMD
STALKER uses OGF files to store model data such as the animations, bones, meshes etc, so theGF2SMD converter will convert the OGF files to the SMD format (which is used by Source games, hence why you need to get the SMD plugins from the source SDK.).
The reason we will use this tool is so we can see what weapons use what bones, and if your system isood enough and you wish to edit a weapon from stalker, you can use this tool so that you can openen STALKER's model files in Maya 8.5.
However, you will need a 64bit OS and a 64bit version of Maya to import the weapons without hassle. If you have a 32 bit OS and Maya you WILL run into memory loss errors and it's just a pain to import with 32 bit software. However you need a 32bit version of Maya to export the SMD files I am told
I would also like to note that you DO NOT have to import the smd file into STALKER, but I willhow you how. This section is mainly to show you the details you need inside the smd files. If you don't wish to do this, you can skip ahead.
(Alternatively you can download the milkshape3d trial and open SMD files and their animations without any issues at all regardless of your operating system, I recommend using Milkshape 3d instead of Maya if you just want to view what bones do what. Even when the trial runs out, you can still view ofiles, and that's all we want to use it for anyway, so :) )
BUT, here is what you need to do:
- Extract OGF2SMD to a folder anywhere on your HDD, I put mine on the C:\
- Go to:
C:\Program Files\THQ\S.T.A.L.K.E.R. -Shadow of Chernobyl\gamedata\meshes\weapons\knife - Copy the "wpn_knife_hud.ogf" to:
C:\ogf2smd_203\release - Delete or rename the "hud.ogf" file that is already in the folder, and rename"wpn_knife_hud.ogf " file to "hud.ogf"
- Go to the folder that says "smd" and delete everything inside except for the bat file if there are any files inside. And create a folder called "knife"
- Go back to where your "hud.ogf" file is and open the file called "smd.bat" to convert the ogf file.
- Go back into the "smd" folder again and copy the .smd files to your "knife" folder (this is justo keep things organized for when or if you decide to convert more ogf files).
Go to your "knife" folder and right click > open with on the file that says "reference.smd" andke note of the bone that says "wpn_knife_0" (You will see why later)
(Follow these steps if you wish to import the smd file (NOTE: Only do this if you wish toedit a weapon model or animation, otherwise you don't need to open the smd files, if youdon't wish to do this step, you can skip to step 8 of the larger sized font.)
- Open Maya 8.5
- Go to file > import SMD and select the reference.smd file inside of:
C:\ogf2smd_203\release\smd\knife - When it asks to load textures, click cancel each time.
- The entire process takes about 10minutes, however I haven't successfully imported the knife model with32bit windows XP, so once again I recommend using a 64bit operating system with more than 2gb ofRAM for this process.
- When the model is imported, you can select the mesh (not the bones) and separate the hands from theweapon. By following the picture below:
- Delete the hands and bones.
- When you extracted the ogf2smd.rar file, you may have noticed a file called "hands.mb" was extractedas well. Go to maya and click file>import and find the "hands.mb" file and open it.
- You now should have a knife model and new hands with bones. You can now proceed to the large font ofstep 8 to continue the tutorial. Later I will explain what you do from this point onwards but instead of aknife, I will be using a simple box.
- When you extracted the OGF2SMD.rar file, you would have noticed it extracted a"hands.mb" file. Open that file.
- You will notice you will have 2 hands and some bones (ooo scary!) so now we're reading tocreate our weapon or import one you have already made. But for purposes of this tutorial weare going to make one inside the same scene.
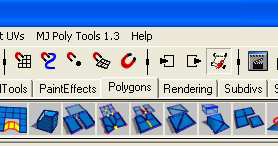
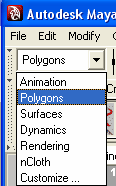
First we need to make the normals on the hands nice and smooth, so simply select the hands, go to Normals >Soften Edge up in the menu. - Make sure that you are in the "polygons" tab like in the image below:
- The area where all the strange icons are, is called the Shelf, to the far left of the shelf there is abox icon, create a box like shown in the picture below (if you don't know how to create a box, follow the tutorials which you can find in help > learning movies.


Bones, weights and animation
Hooray, you've made it this far, and now we're going to be doing the fun stuff.
NOTE that I am NOT an animator, however I will be one. I was going to forget about animationuntil it was necessary, because I watched an 8 hour tutorial by gnomon and it scared me away fromanimation, it made animation sound super complex, and it's NOT, if you've done any 2danimation with flash or other programs that use keyframes, then this is pretty much the same thingin 3d.
So, lets get started shall we?
Setting up the bones.
- Go to the animation tab as shown:
- Click on the "joint tool" icon which looks like this:

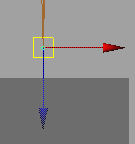
- Click behind your box so that your scene looks like this:
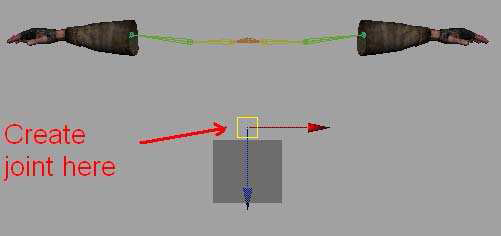
- Now while you have the new joint selected, hold down shift, and click on the jointbehind it which is called bip_01_neck.
- Now double click on the icon shown here to connect the joints:

- A new window will pop up, select "Parent Joint" and click Apply.
[[Image:wi8.png] - You should should now see this:

- Now click on the joint that you made before. Make sure you only click on thecircle/sphere and not the long bone section.
- It will look like this when selected:
- Now you have it selected, you need to view it's properties. So in the top right corner of maya, there are 3 icons that look like this:
Image:49.jpg
Click on the last icon, and you'll notice the side of your screen will change. - Click on the grey/blue bar that has "joint1" written inside of it and rename it to"wpn_knife_0" then press enter like so.


And this is all we need to do with the bones for now.
Creating a material and applying it to our weapon
In order for our weapon to be recognized by the XRay engine we need to assign it amaterial. If you don't do this, the object will appear to be white in the actor editor, and itwon't export the model.
Now we have our materials set up inside of Maya (we did that previously), I would like youto double check to make sure the plug-ins are activated.
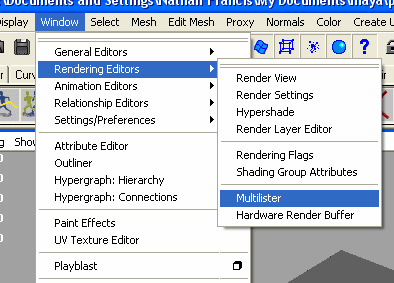
- Go to Window > Rendering Editors > Multilister as shown below:
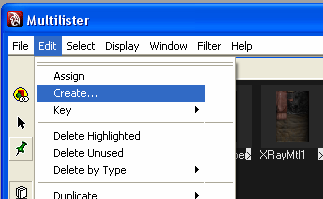
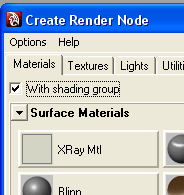
- Now a window will pop up with some cylindrical objects and other stuff. Goto edit>create and a new window will pop up that looks like this:
- Click on the XRay Mtl button in the "Materials" tab as shown below: (Ifyou can't see the button, then you haven't installed the plug-ins correctly)
- Now click on the middle button in these icons in the top right that we used before
 and the material properties will appear on the righthand side of the screen.
- Now click on the black and white checkered box next to "colour". A new window will pop up Just like the one in the picture above (Create RenderNode window). Click on "file" inside this new window"
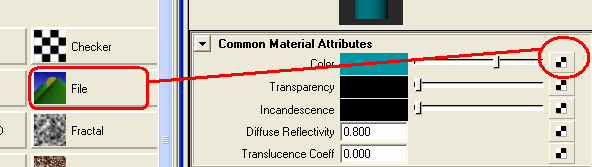
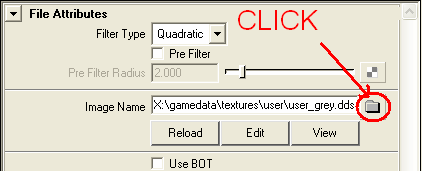
- Now a new properties menu will appear on the right, click on the little foldericon to find your texture (remember to follow the tutorial in the XRay SDK that I mentioned before):
- Now go back to the "multilister" window and double click your newmaterial. Then in the properties, you should have these settings:

However you can have a look at the link Docs:Creating a scene in Maya for a full list of the differentshaders and what they do. - Now select your box weapon and then right click on your material


>edit>assign then click OK on the next popup to apply the material andtexture.
Combining the mesh and deleting history
This part is quick and simple, we just need to combine the weapon (box) mesh to the armmesh and delete the history on it to prevent errors occurring later on.
FIRST though, I will say to SAVE YOUR PROGRESS as an .mb file or .ma file, itdoesn't matter. Just call it "progress.mb" for now.
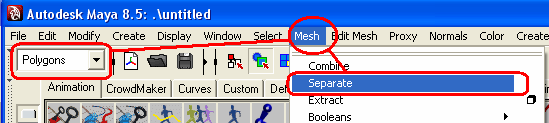
- Click on your box and then click on the mesh (only the mesh) on the arms.
- Make sure that you are in the polygons menu now, you can select this bygoing to the menu shown here:

- Go to Mesh >Combine as shown below:

- Now making sure only the mesh is selected, go toEdit >Delete by type>history, as shown below:
Imagewi20.png


Rigging, weighting and animation
I'll remind you that I am not going to go into rigorous and complex animation for this tutorial. I amjust showing you the very basics of everything, otherwise this tutorial would take me weeks towrite. Rather than a few hours.
Rigging the mesh
- Select the mesh and click on a bone in the scene.
- Now go to the "animation" menu:
- Go to Skin >Bind Skin >Smooth Bind as shown below:
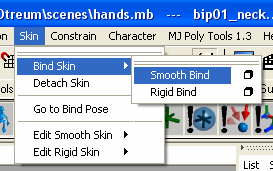
- Make sure that the "animation" tab is opened like so:
- Save the file again.


Weighing the model
- First Click on the Mesh of the arm.
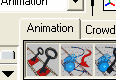
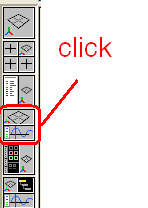
- Now in the Animation shelf click on the paint weights tool which looks like this:

- You will notice once you do this, the mesh will go black, go to the propertiesfor the tool (you should know how to do this by now). Now move the camera over to the thumb.
- Go to the next page to see what does what in the properties:
-
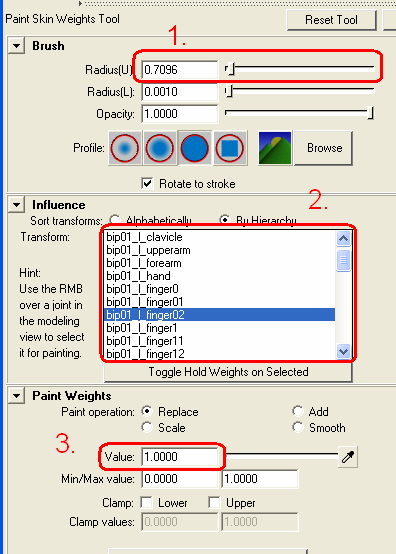
- Brush size
- This is where youselect which bone youwant to paint theweight for.
- Just set this to 1
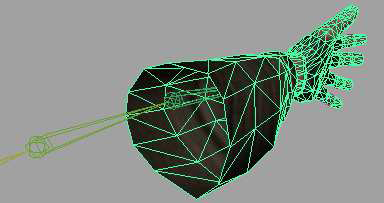
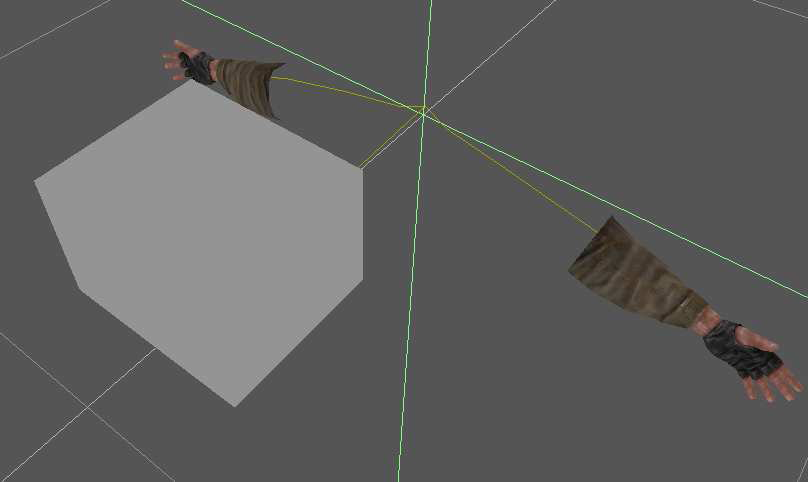
- For now click on bip01_l_finger02 to start with (this is the tip of the rightthumb (which is strange because it shows as being the left thumb).
- Now you'll see a faded white colour on the thumb, if not, go to the otherhand and look. You need to paint the weight on the thumb tip and all fingertips for each fingertip bone. (shown in picture after step 8)
- Next you need to select the bone "bip01_l_forearm" and paint everythingdown to the wrist like so:
- Now repeat on the other arm and fingers. And this will prevent the arm meshfrom lagging behind when you move the bones.
- Now select the bone "wpn_knife_0" and paint your box weaponcompletely. Like so:
- Save the scene as "reference.mb" now.
- Now select the mesh and go to file> export selection.
- Export the file as XRay_skin_export (*.ob*) and call it reference.ob....oranything else you want. Since it's our canvas for animation, I like to just callit reference.ob


Basic animation
Now we're going to do some really basic animation and I'll show you some things that are handywith animation. Remember this is BASIC, don't expect rocket science!
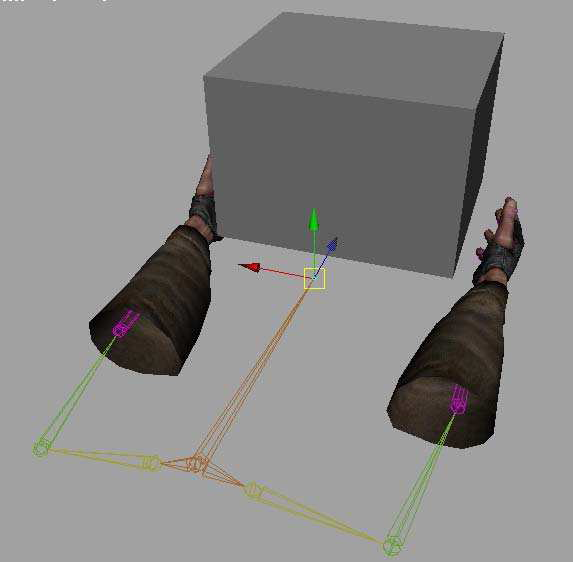
- First, we're going to move the arms forward to a position which looks likethe character is carrying the box, click on the joints indicated in the picture below:
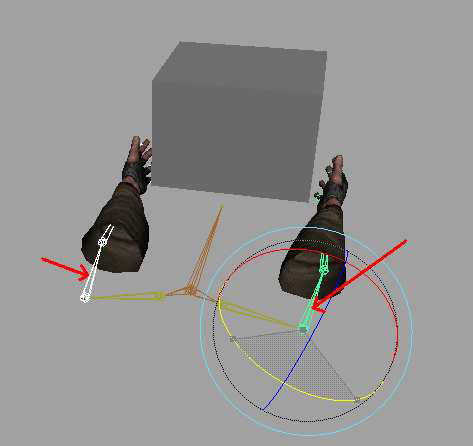
- Now the first animation we're going to create is a simple "draw" animation; The player pulls the weapon out, and brings it into view.
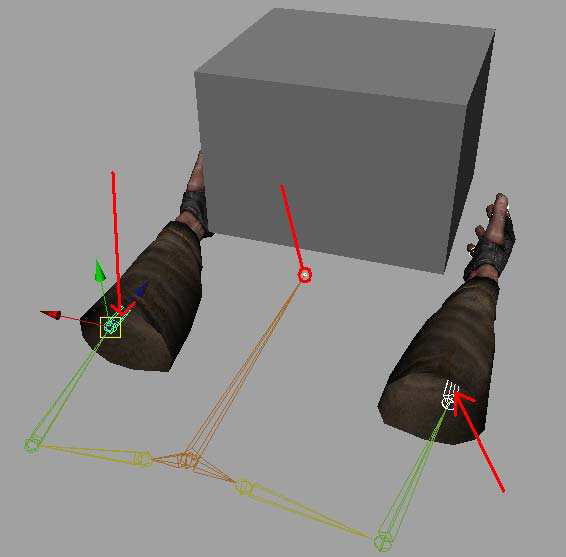
- Click on the wpn_knife_0 joint and shift click on both forearm joints asshown in the picture below:
- Now click the icon that looks like this
 which is at the right end of youranimation Shelf.
- Now if you click on the joint wpn_knife_0 you'll notice that the 2 forearmjoints will be purple (shown in picture below). Now you can simply movethe wpn_knife_0 joint and you'll notice that the arms move with it.
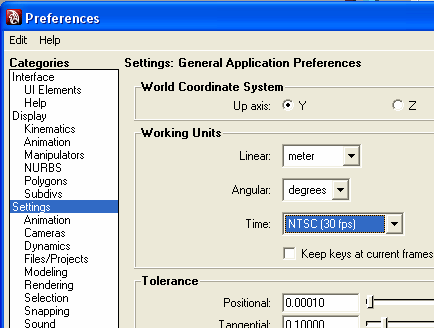
- Go to Windows >Settings/preferences >Preferences
- In the new window choose these settings shown in the picture below andsave the settings:
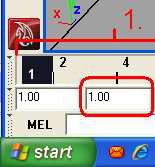
- Go to the bottom left of your screen and change the number in the 2nd box to1.00 (surrounded by red box in picture). And notice that figure 1. in thepicture is your timeline for animation, it will be spread across down thebottom in 30 frames for the time being.
- SAVE the scene as an .mb file first Call it "reset.mb". Now we can startsetting keys. Make sure that wpn_knife_0 is selected and go to frame 30 andpress "s" to set a keyframe. (NOTE: You do not HAVE to create thereset.mb file, you can simply just delete the frames in a scene once you'veexported the animation.
- Now click on the first frame like shown in the previous picture, and movethe bone down to where you think the player wouldn't see the box and thehands on screen. And press "s" to set a keyframe again.
- Now on the bottom right corner, you will have some icons. You'll reallyonly want to focus on the play button and how many frames you want inyour animation for the time being.
(figure 1. is the amount of frames in your animation, figure 2. is the playbuttons etc)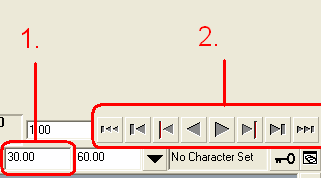
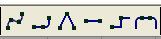
- Now, I wasn't going to put this into the tutorial but I think it's a veryimportant aspect of fine tuning your animations. On the left hand side ofyour screen there is a viewport changing icon which will split your screenwith your perspective view on top and graph editor on the bottom indicatedin the picture below:
- You will notice there are a few buttons up the top of this window. The ones Iwant you to take note of for now are these ones:
It's hard to explain what each do without a video, but say for example youhave a box that animates to quickly go up and down every 10 frames for 30 frames, as if the box is being shaken up and down, and you want it to looknatural, you can select the first icon in the picture and it will smooth theanimation out, I think it is set to this by default, so say for example you wantthe box to be very jerky with movement with no smoothing, you would clickthe icon that looks like a straight line (linear motion) - Now that we have a simple animation, click on the mesh (not the bones) andgo to file >export selection, and export the file as anXRay_skin_motion_export (*.skl*) file. Call it "draw". Now we have exported an animation. We will do a few more animationsnow.
- To make things easier, go to file >open and open up your "reset.mb" file. (You don't need to save the animation you were just doing, but if you wantto, you can if you want to edit it later) (NOTE: You don't have to openreset.mb remember, you can just delete the keyframes instead)
- Select the wpn_knife_0 bone now click on frame 1 and set the keyframe.
- Now go to frame 30 and move the box down out of sight and set the frame again.
- Export the animation again as an skl file and call it "hide"
- Open reset.mb again.
- Lets do an idle animation now. So for this, we can simply click the 1st frame and set it, then copy that frame and paste it to frame 30.
- Go to frame 15 and move the box down a tiny little bit as if the player wasbreathing22. Remember that if you don't like the looks of your animation, you can go tothe graph editor and change the type of animation path that your animationuses.
- Export the animation again as an skl file and call it "idle"
- Finally we want attack animations, with the knife model there is actually 4 animations for attack. So in our example, our first attack animation willswing down and stop, the 2nd animation will be where the 1st attack stops andreturns to the normal position, and the same goes for the alternate attack, solets open up reset.mb again, select the wpn_knife_0 and put a keyframe at the first frame again.
- We're just going to do a simple push forward animation, so change the amount of frames in your animation to something like 7 will be fine (Ihope you remember how to do that, it's the text box near the play buttons)
- Go to frame 5 and pull the box backwards a bit and set the frame27. Copy frame 1 to frame 7 and then move the box a little bit forward of thedefault position and set the frame in frame 7.
- Export the animation as an skl file and call it "attacka"
- This time don't re-open reset.mb, but instead, delete the key at frame 5' and swap frame one over with frame 7.
- Export again as "attackb"
- We won't worry about doing the secondry attack right now, but if you want, you can make an alternate attack.
- Now we are all done, we can close down maya.


CONGRATULATIONS ON GETTING THIS FAR, WELL DONE!!!
Working with the actor editor
If you have used any of the editors before, you'll find that they are all very similar in layout andfunctionality which is excellent because it means less confusion for the end user.
Lets start this shall we.
- Go to C:\Program Files\X-Ray SDK\level_editor and open ActorEditor.bat (the exe files do not work)
- Go to the top right corner of your screen and go to file >load, now find yourreference.ob file and open it.
- You should now have your model in the actor editor like below.
- Now click on where it says "bones" on the right hand side of the screen.
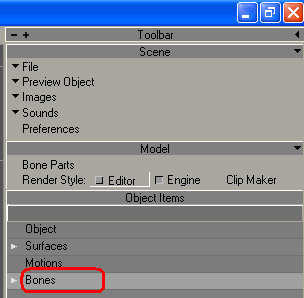
- You will notice down the bottom right corner of the screen has changed inthe item properties. You first need to click on "reset IK" which isrepresented as "Re..." (shown in picture below as step 1.)
- Then you will be asked if you want to reset the IK, click on "YES"
- Now in the same properties screen in the bottom right, click on "All" (shown in the picture as step 2.)
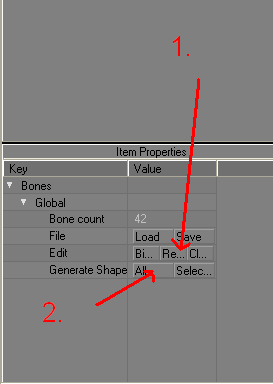
- Above where you clicked on "bones" before, you need to click on"Motions" then go back down the bottom right hand corner of the screenagain.
- Click the append button which is represented as "Ap..."
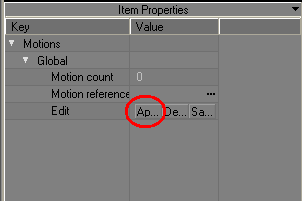
- Now a browse window will popup. Browse to the .skl files that you created. Select them all and click "open" to load the animations into your scene. (NOTE: since the SDK is buggy, yesterday when I imported the Katana, Ihad no issues importing animation, but today, when I tried importing them, Igot errors, all I will say is that if you get any errors, try and import theanimations individually, and ignore any error message you get. Some errors that I ran into were: (Dammit, now the errors havedisappeared....thats what I'm talking about with being buggy)
- Your animations will appear on the right under the motions section likeshown below:

- Click on "draw" to start with and look at it's properties down the bottomright. You will also notice that in the viewport your model will animate.
- You will notice that the animation loops. The only animation we want to loop, is our idle animation, so to stop it looping animations (attacka, attackb, draw, hide), you need to tick the boxes shown in the picture below, while you're here, make sure to select "default" as the bone part orthe model wont export also make sure "idle" has a default bone part:
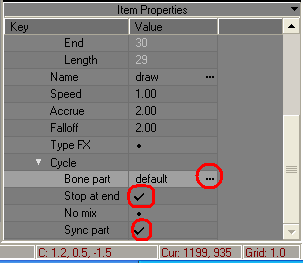
- Check to look at your animations to see if any are looping other than "idle".
- Go to file >export> export OGF to:
D:\Program Files\THQ\S.T.A.L.K.E.R. - Shadow of Chernobyl\gamedata\meshes\weapons\knife


You can make your own folder, but for now just export to the knife folderand called your weapon "wpn_box_hud.ogf" (you can also call it anythingyou like, but for this tutorial that's what it'll be called)
If you get any errors, make sure you check that you have set the bone part todefault on all of the animations.
The final stretch, editing the knife.ltx file
- Go to: C:\Program Files\THQ\S.T.A.L.K.E.R. - Shadow of Chernobyl\gamedata\config\weapons and copy the file w_knife.ltx so you have a backup.
- We are now going to do some editing of the w_knife.ltx file, so open up the w_knife.ltx file with notepad.
- The only bits we need to worry about, are the bits highlighted below:
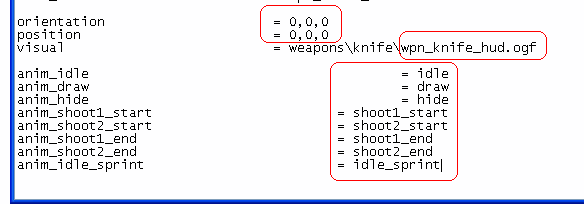
- You may or may not have noticed that in Maya, our model was facing in aminus direction, which means that we have to change the orientation of ourmodel in the ltx file to -180 degrees. So where it says "Orientation" changethe values so it is "-180,0,0" .
- As a test, I noticed that our model is a bit too high, so you'll need to adjustthe Y value (X,Y,Z) where it says "position", Depending on the model, youmay need to change the value to more or less, but you should only need togive it a lesser value, so change it so "0,-.1,0" or lower if you'd like.
- Where it says "Visual" is where it is looking for the object file, which in ourcase is "wpn_box_hud.ogf", so change the line so it says: = weapons\knife\wpn_box_hud.ogf
- Now for our animations, since we use very similar names to the ones alreadyin the w_knife.ltx file (idle, draw, hide) we don't need to edit those bits, butwe do have to change the attack animations and the idle_sprint animation.
- So your settings should look exactly like the settings shown below:
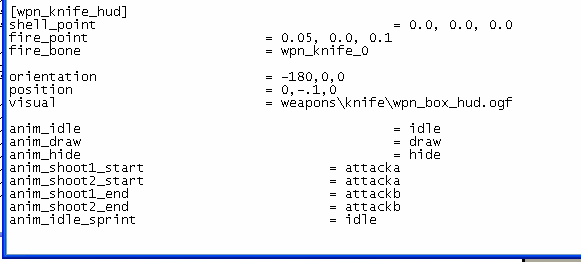
- Save the file, and it's time to go into the game. Start a New Game, or go to multiplayer, and pull out your lovely pretty looking box. Test out theattack that we have, test out the range and damage of the attack etc, and seehow it goes. Now you can run around killing enemies with your box o'death.


