Weapon model creation (HUD)
From Mod Wiki
| Revision as of 08:28, 6 March 2008 (edit) Bac9-flcl (Talk | contribs) ← Previous diff |
Current revision (12:19, 7 March 2008) (edit) (undo) Bac9-flcl (Talk | contribs) (→5. Model configuration in Actor Editor) |
||
| (11 intermediate revisions not shown.) | |||
| Line 1: | Line 1: | ||
| ==HUD model creation== | ==HUD model creation== | ||
| ===1. Introduction=== | ===1. Introduction=== | ||
| - | |||
| - | '''Translation in progress, please wait.''' | ||
| This tutorial is about weapon HUD-model creation. We do not recommend it to unexperienced users of 3DSMax, so don't ask something like "how to create sphere?". That's what we'll get in the final (3DSMax): | This tutorial is about weapon HUD-model creation. We do not recommend it to unexperienced users of 3DSMax, so don't ask something like "how to create sphere?". That's what we'll get in the final (3DSMax): | ||
| Line 11: | Line 9: | ||
| Before this tutorial, I recommend to read [[Model export tutorial]]. | Before this tutorial, I recommend to read [[Model export tutorial]]. | ||
| - | + | If you want to work with the game model, I recommend '''ogf2smd''' plug-in for import, because the same function in '''OGFViewer''' function creates 11 polygons on the each coordinate, making almost impossible to use the model. | |
| + | ===2. Materials=== | ||
| - | + | Let's open the 3DSMax. Import the model, open the matetial editor (М button by default). Clink on the '''Standart''' button, choose '''STALKER Mtl'''. | |
| - | + | ||
| - | + | ||
| - | + | ||
| - | + | ||
| [[Image:Hud lesson 2.jpg]] | [[Image:Hud lesson 2.jpg]] | ||
| - | + | Clink on the little button near the '''Diffuse''' function, choose '''Bitmap''', and select your texture. Now, assign it to the model. That's all, we've finished with the texturing. | |
| + | ===3. Bones creation=== | ||
| - | + | It's better to use '''Bone Tools''' utility, situated in '''Character''' menu.<br><br> | |
| + | You can see, now the bones are placed in the HUD-model, in the attached file below. But the main thing is to crate the main, central bone, from which the hand and weapon skeletons will be built. Bones are created in '''Create''' -> '''Systems''' -> '''Bones'''. | ||
| - | + | ===4. Skeleton attaching=== | |
| - | + | After the bone placing, use '''Physique''' modifier, press '''Attach to node''' –> '''Rigid\Deformable''' –> '''Initialize''' button. Now, the skeleton is ready for attaching. | |
| - | + | *Important note: in every weapon model, must exist wpn_body bone. Without it - the game will crash. | |
| - | + | ||
| - | + | ||
| - | + | ||
| - | * | + | |
| [[Image:Hud lesson 3.jpg]] | [[Image:Hud lesson 3.jpg]] | ||
| - | + | Turn on the '''Vertex''' modе, and, during '''Select''' button pressing (do not forget to mark the blue "plus" symbol) choose the vertexes, then press '''Attach to link'''. Next, mark the red "plus" symbol (or red, if the object is solid), then click on the bone and choose '''Lock Assignment'''. Repeat this with all bones. | |
| [[Image:Hud lesson 4.jpg]] | [[Image:Hud lesson 4.jpg]] | ||
| - | + | After finishing the bone attaching, save it to file in '''Physique''' root settings with '''Save to *.phy''' button - it'll be useful in future. | |
| [[Image:Hud lesson 5.jpg]] | [[Image:Hud lesson 5.jpg]] | ||
| - | + | Now, we can begin to work with the animation. | |
| - | ===4. | + | ===4. HUD-model animation=== |
| - | + | You can use '''Set Key''' mode and '''Auto Key''' mode, but the second is more useful.<br><br> | |
| - | + | Press the '''Auto Key''' button, choose the bone (to make animation process easier, just press the '''Context menu (RMB)''' –> '''Freeze selected''' in one of the viewports), fix it with pressing the key, and move the animation scroller to another position - trajectory and key frames will be created automatically. | |
| - | + | ||
| Line 61: | Line 53: | ||
| - | + | After the model export (without animation), choose our animation and, in the '''Stalker Export''' utility, select '''Export Motion'''. Animation will be converted to '''*.skl''' format. | |
| - | * | + | |
| + | * If the game CTD with ''cannot find anim [...]_r'' log or something else, just create copies of all your animations with '''_r''' endings. | ||
| [[Image:Hud lesson 7.jpg]] | [[Image:Hud lesson 7.jpg]] | ||
| - | ===5. | + | ===5. Model configuration in Actor Editor=== |
| - | + | Open the '''Actor Editor'''. Configure parameters in the '''Surface''' section. I've used this ones: | |
| * '''models\weapons''' | * '''models\weapons''' | ||
| Line 78: | Line 71: | ||
| [[Image:Hud lesson 8.jpg]] | [[Image:Hud lesson 8.jpg]] | ||
| - | + | But, you can try something else.<br><br> | |
| - | + | Then, configure parameters in the '''Bones''' section. Select all bones, then choose '''Type''' -> '''XXXX''', it doesn't matter; and - '''Game mtl\objects\small_weapon''', then press '''Generate shape''' -> '''All'''.<br><br> | |
| - | + | To stop ingame animation looping, mark '''Stop at End''' and '''Sync Part''' options. | |
| - | + | ||
| - | + | ||
| [[Image:Hud lesson 9.jpg]] | [[Image:Hud lesson 9.jpg]] | ||
| - | + | After that - we need to configure our animations. Open the '''Motions''' section, press '''Append''', select all our '''*.skl'''–animations and include them in the model. Edit speed, smoothing, etc. in the parameters. There are seven standert animations in simple weapon like MP5: | |
| * idle | * idle | ||
| Line 100: | Line 91: | ||
| [[Image:Hud lesson 10.jpg]] | [[Image:Hud lesson 10.jpg]] | ||
| - | + | Select the main bone coordinates and copy them to the weapon config. | |
| - | + | Also, in '''[wpn_..._hud]''', there are shell creation and shot particle coordinates. To make configuring easier, just create additional bones on the suiting places of the model, and copy their coordinates. | |
| - | + | I do not recommend to try to create the models like M4A1, if you're the beginner. For the first time, try to create simple assault weapon named "Cube" =) | |
| - | ===6. | + | ===6. Source files=== |
| - | + | You can download them [http://www.sendspace.com/file/2s4opx there]. | |
| - | == | + | ==Authors== |
| - | ''' | + | '''Article was created by:''' [[User:Egorych|Egorych]]<br> |
| - | ''' | + | '''Thanks to:''' [[User:Haron|Haron]], [[User:tambovski|tambovski]], [[User:Alwen|Alwen]]<br> |
| - | ''' | + | '''Translated by:''' [[User:Bac9-flcl|BAC9-FLCL]] |
| - | [[ | + | [[Category:Articles]] |
Current revision
Contents |
HUD model creation
1. Introduction
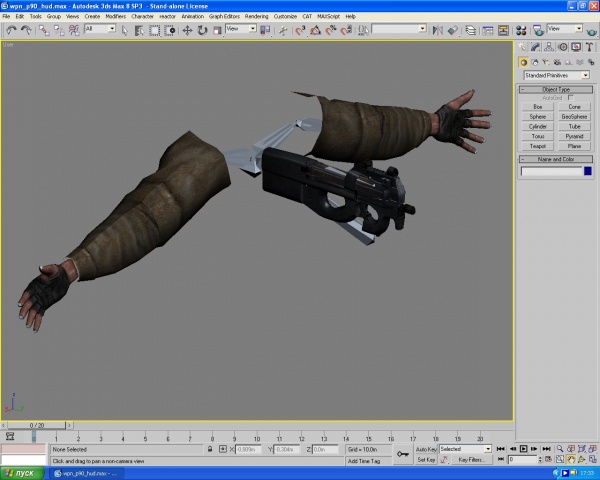
This tutorial is about weapon HUD-model creation. We do not recommend it to unexperienced users of 3DSMax, so don't ask something like "how to create sphere?". That's what we'll get in the final (3DSMax):
Before this tutorial, I recommend to read Model export tutorial.
If you want to work with the game model, I recommend ogf2smd plug-in for import, because the same function in OGFViewer function creates 11 polygons on the each coordinate, making almost impossible to use the model.
2. Materials
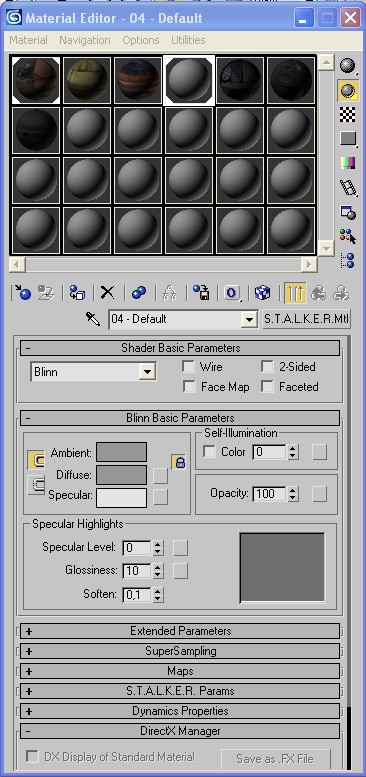
Let's open the 3DSMax. Import the model, open the matetial editor (М button by default). Clink on the Standart button, choose STALKER Mtl.
Clink on the little button near the Diffuse function, choose Bitmap, and select your texture. Now, assign it to the model. That's all, we've finished with the texturing.
3. Bones creation
It's better to use Bone Tools utility, situated in Character menu.
You can see, now the bones are placed in the HUD-model, in the attached file below. But the main thing is to crate the main, central bone, from which the hand and weapon skeletons will be built. Bones are created in Create -> Systems -> Bones.
4. Skeleton attaching
After the bone placing, use Physique modifier, press Attach to node –> Rigid\Deformable –> Initialize button. Now, the skeleton is ready for attaching.
- Important note: in every weapon model, must exist wpn_body bone. Without it - the game will crash.
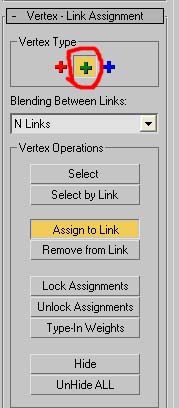
Turn on the Vertex modе, and, during Select button pressing (do not forget to mark the blue "plus" symbol) choose the vertexes, then press Attach to link. Next, mark the red "plus" symbol (or red, if the object is solid), then click on the bone and choose Lock Assignment. Repeat this with all bones.
After finishing the bone attaching, save it to file in Physique root settings with Save to *.phy button - it'll be useful in future.
Now, we can begin to work with the animation.
4. HUD-model animation
You can use Set Key mode and Auto Key mode, but the second is more useful.
Press the Auto Key button, choose the bone (to make animation process easier, just press the Context menu (RMB) –> Freeze selected in one of the viewports), fix it with pressing the key, and move the animation scroller to another position - trajectory and key frames will be created automatically.
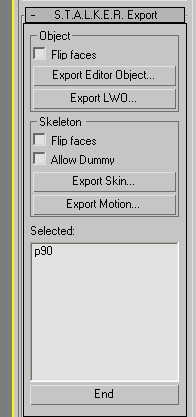
After the model export (without animation), choose our animation and, in the Stalker Export utility, select Export Motion. Animation will be converted to *.skl format.
- If the game CTD with cannot find anim [...]_r log or something else, just create copies of all your animations with _r endings.
5. Model configuration in Actor Editor
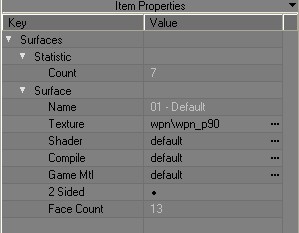
Open the Actor Editor. Configure parameters in the Surface section. I've used this ones:
- models\weapons
- def_shader\def_vertex
- game mtl\objects\small_weapon
But, you can try something else.
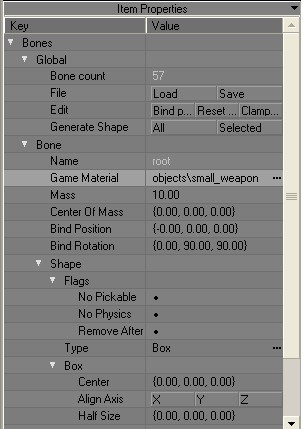
Then, configure parameters in the Bones section. Select all bones, then choose Type -> XXXX, it doesn't matter; and - Game mtl\objects\small_weapon, then press Generate shape -> All.
To stop ingame animation looping, mark Stop at End and Sync Part options.
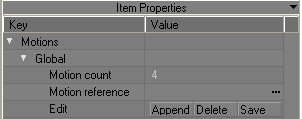
After that - we need to configure our animations. Open the Motions section, press Append, select all our *.skl–animations and include them in the model. Edit speed, smoothing, etc. in the parameters. There are seven standert animations in simple weapon like MP5:
- idle
- idle_aim
- idle_sprint
- shoot
- draw
- holster
- reload
Select the main bone coordinates and copy them to the weapon config.
Also, in [wpn_..._hud], there are shell creation and shot particle coordinates. To make configuring easier, just create additional bones on the suiting places of the model, and copy their coordinates.
I do not recommend to try to create the models like M4A1, if you're the beginner. For the first time, try to create simple assault weapon named "Cube" =)
6. Source files
You can download them there.
Authors
Article was created by: Egorych
Thanks to: Haron, tambovski, Alwen
Translated by: BAC9-FLCL
