Maya tutorial
From Mod Wiki
| Revision as of 13:49, 6 February 2008 (edit) Don Reba (Talk | contribs) (added a little more formatting) ← Previous diff |
Revision as of 05:28, 8 February 2008 (edit) (undo) Bac9-flcl (Talk | contribs) (added the last forgotten picture =)) Next diff → |
||
| Line 452: | Line 452: | ||
| Just like the above section, I will start by showing a picture of the buttons. | Just like the above section, I will start by showing a picture of the buttons. | ||
| - | + | [[Image:Viewtoolbarbh3.jpg]] | |
| '''1.''' F, B, L, R, T, B, X: These are the different preset camera POSITIONS, these will work off your current camera position, so if you are above a level and press top, you will see the level below you, however if you press bottom, you won't see the bottom of the level, you will see the sky. So it's best to just not worry about these things. I am sure that later on they may become more useful however. | '''1.''' F, B, L, R, T, B, X: These are the different preset camera POSITIONS, these will work off your current camera position, so if you are above a level and press top, you will see the level below you, however if you press bottom, you won't see the bottom of the level, you will see the sky. So it's best to just not worry about these things. I am sure that later on they may become more useful however. | ||
Revision as of 05:28, 8 February 2008
Tutorial created by Natace in May 2007.
Setting up Maya 8.5 to begin level creation
Plugins and exporter for Maya 8.5:
1. Go to C:\Program Files\X-Ray SDK\scripts_plugins\scripts\ and copy all of the contents of that folder into C:\My Documents\maya8.5\scripts\
2. Go to the folder located at C:\Program Files\X-Ray SDK\scripts_plugins\ver-8.5plug-ins\ select all the files inside there and copy them into C:\Program Files\Autodesk\Maya8.5bin\
3. Go to C:\Program Files\X-Ray SDK\scripts_plugins\ copy the file called xray_path.ltx into C:\Program Files\Autodesk\Maya8.5bin\
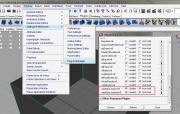
4. I almost forgot to include the most important steps. So open up Maya 8.5. Go to:
As you can see, there is a highlighted area, go to this and check the boxes "loaded" and "autoloaded" for both xraymaya_export.mll and xraymaya_material.mll
This is required to be done, otherwise you won't be able to export from Maya.
Maya 8.5 - Setup
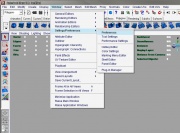
1. Click on Window > Settings/Preferences > Preferences:
2. A new window will appear, go down to the menu on the side named Settings and click on that. Change the linear parameter to metre if it isn't set on metre already:
This will change the unit size into metres, otherwise you may end up making a huge map that is actually only 1x1 metres because the unit measurement is set as cm or mm.
3. Now further down the list on the right, click on Cameras and slide the far clip slider to the right as far as it goes:
This may possibly change the view distance in Maya, do this as a precaution, however I don't think it is absolutely necessary.
4. Save those settings by clicking on the Save button at the bottom of that window.
5. In the user interface, if you don't see 4 view ports, click in the one that already exists, and press spacebar. This will bring up the 4 different view ports if they aren't shown already. If you have all 4 view ports showing, you can click in one, and press spacebar to focus only on that one view port to work on.
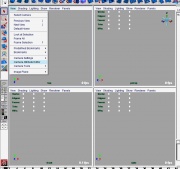
6. Go up to the corner of each of the view ports and click on View > Camera attribute editor:
7. You will notice that something happened on the right side of the interface, go to the text box that says Far clip plane and change the number to 1000 and press enter:
If you couldn't see your grid in the view ports before, you will see it now, and this solves a really annoying problem with your view distance inside the view ports.
8. Now if you wish to change your grid size, click on Display up the top and click the little box icon next to Grid.
When you've done that a window will appear, and you can change your grid size to something much larger if you so choose. To do this, click on the Length And Width text box and change the value to something like 120, which would make the grid size 120metres x 120metres.
This concludes this section.
I was originally going to have a camera movement section, but if you have Maya 8.5 you can go to Help and click on Learning tutorials. So the next section will be creating your first level. This will be rather lengthy, lots of screenshots need to be made and uploaded, so it will be a while before it is done. Not too long though.
Modelling the level
Before I go on to the main bit, there is a little tab that acts as a drop down menu. Change it to Modelling to follow this tutorial. To see what I mean, look at this picture.
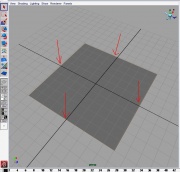
1. Go to Create > Polygon > Primitives and click on the little box icon next to Plane.
2. You will see the plane settings over on the right hand side of the screen where you can select the width and height of your plane. Because you are going to make a room that is 10x10x5 we have to change the Width and Height parameters to 10. You also need to make sure that there are no subdivisions, so you need to make sure that Width divisions and Height divisions are set at 1.
3. Once the above is setup, you simply just need to click in one of your view ports, for the best results, click on the Top view port. In order to see which view port is what, you'll see a little word in the window that says Top Front Left Right Persp etc.
So click in the one that says Top.
4. You now have a plane in your view ports, but you will notice that inside of your Persp view port, you will only see a wireframe of your plane. To make it so you are only looking at the wireframe, press 4 in the view port. To make it so you see a shaded Goraud texture in the view port, press 5, and to see textures press 6.
So go to your Persp view port and press 6 so we don't have to change it later.
5. Now you will want to make some walls, and to do this, you need to hold down the right mouse button and a context menu will appear (I can't take a screenshot of this for some reason). At the top of it is a word that says Edge - click on this to allow the selection of edges.
6. Click on all 4 edges, when they are not selected, they will be blue, but when you select an edge, it turns orange as you can see in this picture.
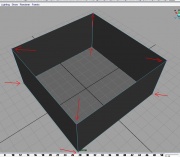
7. Go up to the Extrude Edge icon and click on it.
8. You'll notice that on the side of your screen you will have some information on your new edges. But what you need to do, is go up to the top right corner of the Maya interface and there are 3 icons that look like a bunch of lines and scribble (they are pointed out in the picture provided), click on that icon, and you will get a bunch of stats which come in handy when you want precise measurements done on your objects.
So, because we want our walls to be 5 metres high, we need to go to the Local Translate Z text box and change that to 5, and press enter, this will now make your walls 5 metres high.
9. To fix up our level a bit, we need to make sure that everything Is connected properly.
So because we have selected 4 edges and extruded them upwards together, there may be more things than we actually need in our level.
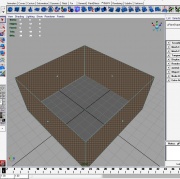
So right click in the Persp window, so that the context menu shows up, and click on Object , next select the level by clicking on it, and go to the context menu again, this time go to Vertex and this will allow us to edit the vertices (corners). So now we have a bunch of little purple dots on each corner, as pointed out in the picture.
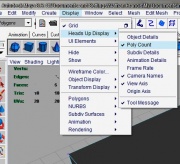
10. Now, you need to make sure that you can see what you have selected. So next, go to Display > Heads up display > Polycount To check to make sure that you can see some of the important statistics of your scene.
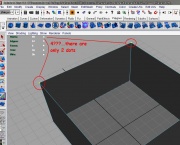
You will notice that in your view ports a bunch of numbers will appear, it's pretty self explanatory, but what we need to look at is the 3rd column of numbers. If you click on 1 of the vertices (purple dots) you will see the number 1 in the 3rd column in the row that says Verts (which is the top row) if you select 2 vertices, it will show up as 2.
So for example, look at the next picture, it is the same map, but instead of extruding all the edges at once, I extruded 3 edges at once and then did the 4th one separately. Meaning that it doesn't share the same vertices as the adjacent edges. In this picture, you can see that 2 dots have been selected, which would normally mean that there are 2 vertices, but nope, they are 2 groups of 2 vertices in the exact same position as one another. So how do you fix this? You don't have to delete all the edges and do them at the same time, but instead, go to the next step.
11. To fix this problem you have to first select the vertices you wish to merge, and then go up to the button that says Merge vertices and as you can see on the picture, there is now only 2 vertices rather than 4, and this makes work flow a hell of a lot easier as it prevents possible problems. Just another thing I want to add about merging vertices, is that I think, by default, Maya has a rather large merging distance, meaning that if you select this whole level to fix up those vertices, your whole level could possibly merge together and become this clumped mess. For example, if I wanted to create a pyramid, all I would need to do is select the top 4 corners, and click merge and they'd all come to the middle at a point.
So to change this, you need to go to:
Edit Mesh > Merge (little cube button next to it).
A new window will pop up with a slider in it saying Merge threshold. If you want to only merge vertices that are in the exact same spots, set the threshold to what is shown in the picture, if you want to merge vertices that are far apart, slide the threshold so that it's higher.
12. Make sure that you save your progress, so go to File > Save Scene as and call it something like "tutorial".
That concludes this part of this section of making the map in Maya 8.5. The next section will go into adding textures to the map and applying the X-Ray materials to your textured services.
Setting up for texturing
First of all, in order for everything below to work, you will need to do the next set of steps before running Maya 8.5. These steps will allow X-Ray shaders to work in Maya 8.5.
1. First of all, go here:
C:\Program Files\X-Ray SDK\scripts_plugins\
Right click on the createDiscX.bat file and go to Edit in the context menu.
2. Make sure that inside of this file the X: drive is mapped to:
C:\Program Files\X-Ray SDK\level_editor
So to make sure of this, have a look at the .bat file and see if it says the below information. (I'm not sure if the first line was there before editing this, but you want to focus on the line that I have highlighted in bold text)
subst X: /D
subst X: "C:\Program Files\X-Ray SDK\level_editor"
3. Each time before you are about to run Maya 8.5 it is required that you run this .bat file. You can go to:
START > All Programs > X-Ray SDK > Map X-Drive
Here is a quicker easier way of mapping the X-Drive and starting Maya (credit goes to Mikool for creating the batch file and providing the information on how to do this):
Adding “Map X-drive” to Windows startup.
Different operating systems have different ways of doing this, so if you have one of the below, follow the instructions for YOUR OS.
1. Windows 95-98/ME
Create a shortcut for createDiskX.bat to this folder:
C:\Windows\Start Menu\Programs\Startup
Eg: C:\Windows\Start Menu\Programs\Startup\createDiskX.bat
2. Windows XP
Create a shortcut for createDiskX.bat to this folder:
C:\Documents and Settings\All Users\Start Menu\Programs\Startup
Eg: C:\Documents and Settings\All Users\Start Menu\Programs\Startup\createDiskX.bat
3. Windows Vista
At this stage, nor Mikool or I know exactly how to do this, but Mikool provided a little bit of info that may help.
If you go to the All Programs list and right click on the folder that says Startup, then click on Open. Just place a shortcut for createDiskX.bat inside that folder and it should work. If not, hopefully soon I can post up details on how to do it.
Creating a Batch File
This is rather simple, nothing fancy, it's pretty much a shortcut to running createDiskX and Maya without having to having to worry about doing the above stuff, or having to manually start creatediskX all the time before starting Maya.
Ok, open Notepad or a text program, any will do.
Copy and paste the following lines into the text file:
@ECHO OFF
ECHO "run creatediskx"
PAUSE
call "C:\Program Files\X-Ray SDK\scripts_plugins\createDiskX.bat"
ECHO "load maya"
PAUSE
start maya.exe
Now that the you have done this, save as something like stalker-maya.bat. Then, let's begin creating a batch file. This is really simple, nothing fancy just a batch file that when executed will run the creatediskx then load Maya. All you have to do is open and type/copy the following:
call C:\Program Files\X-Ray SDK\level_editor\createDiskX.bat
start maya.exe
Note: line one will vary depending on where the SDK was installed.
Once that is done, just save the file as a filename.bat (I used something like stalker-maya.bat)
If for some strange reason Maya starts up too quick for creatediskX to register, then Mikool has told me that he can add a time delay to the program which will allow creatediscX enough time to register before Maya is started.
Now you can continue.
Texturing your level
1. First, make sure that your X-drive is mapped using one of the above methods.
2. Start Maya 8.5 and open your map (eg: "tutorial.mb" )
4. Go to:
Windows> Render Editor> Multilister
click on that and you will get a new window.
In this window, go to:
Edit> Create
A new window called "Create Render Node" will appear. Click on the surface material that I have highlighted in the picture that says "Xray Mtl"
This will place a new material inside of the "Multilister" window. It looks like a side on view of a blue cylinder.
5. Double click on the Cylinder like icon and the material properties will show up on the side of the screen.
Click on the checkered box that is next to "color"
7. now you'll see that the side has changed yet again, this time there is a line that says "Image name" and a browse folder button, click on the folder as shown in the picture, and locate the texture:
X:\gamedata\textures\mtl_rus_dark_iov.dds
We are going to use this texture for our walls later on.
8. Repeat steps 4 - 6.
9. Now you have to choose a floor texture as well, so this time go to:
X:\gamedata\textures\ston\ston_beton_floor_iov_01.dds
and now you have some textures to use.
10. Minimize the multilister window and select your level. Now hold down right click and go to the context menu again. This time select the one that says "face" and this will allow you to edit the faces on objects. You should now see little blue squares in the middle of each face. Hold down shift to select multiple faces, so select all of the walls of your level, there are only 4 walls so it shouldn't be too difficult. So now you will see something similar to the picture below, only the selected faces will be orange. (The reason why they aren't orange in the picture is because of the JPEG compression).
11. Now, open up the multilister window that you minimized. It will be down the bottom right hand corner of the screen.
12. Select the material that says "XRayMtl1", then go to:
Edit > Assign
You will be given a warning about creating a shading group, click on "ok"
This has now applied the material (texture) to those selected faces. So in order view the texture in the view port, you need to click on the view port and press "6" if you havent already.
You should see something like this:
13. Now repeat step 10, except this time, only select the floor, and assign the material "XRayMtl2" using the instructions in steps 11 and 12.
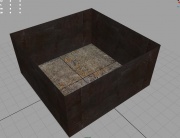
You will now have a fully textured level that looks like the below image:
It's not pretty, but hey, this aint Far Cry.
14. Save your work!
Optional
These textures can be given different properties which can be controlled through maya.
1. So open up the multilister window if you don't already have it opened.
2. Double click on one of the two materials "XRayMtl1", "XRayMtl2" and we're going to have a closer look over at the properties, so over to the right of the screen, you will see little arrows which expand. What you are going to do is click on the arrow next to "XRay Params".
(NOTE: DO NOT MAKE CHANGES TO THE ITEMS BELOW, OR YOU'LL FALL OUT OF LINE WITH THE TUTORIAL)
3. Here we can see a check box that says "Xray Double Side" I have not used this personally, but I would guess that this is used for thin objects like glass, or a sheet of metal or something...we aren't going to touch that check box though. Below the check box are some drop down boxes; Xray Engine shader/compiler Shader/Game Material.
I personally have only edited the Xray Game Material drop down box because I had problems using the other ones, and they aren't needed at this stage.
So right now, until you really NEED to use these drop down boxes, we will leave them for now.
The next section I will cover exporting your level from Maya 8.5 and importing it into Xray Level Editor (this doesnt take long). I will also cover the basic uses of the X-Ray level editor. You will learn how to add objects to your map and manipulate those objects (scaling, moving, rotating). You will learn the basics of the level editor.
The next tutorial will be the last one for now, until I can figure out how to successfully compile our box map and run it in STALKER.
Exporting from Maya 8.5
(Before continuing on, this is a reminder that if you have just started Maya 8.5 again, you need to map the X-Drive which was mentioned earlier, so go to:
START > All Programs > X-Ray SDK > Map X-drive)
1. Open the tutorial map you've already made if you have done so already.
2. Click on your level and go to:
File > Export Selection
3. Now a browse window will appear. Locate the folder
X:\Import
And name your level to whatever you wish to call it... to stay on track with the tutorial, call it "tut".
And click on the export button.
I bet you didn't think that was all there was to it, but guess what...thats it for exporting. Easy huh?
NOW, we have to import the object/ level into the X-Ray level editor.
Importing your level to the x-ray level editor
Close down Maya 8.5 and open up the X-Ray level editor to continue.
When you've opened the X-ray level editor it's fairly well in the design and layout, but you probably don't understand much of what you're looking at yet. Well, I won't explain what everything does YET, because this is showing everyone how to import our level into the x-ray level editor.
1. Go over to the right hand side up the top, and you will see the word "Objects". Click on Objects and then click on "Object Library"
2. Now the "object library" window will appear. You will see some words like details, levels, props and trees. Right click on "levels" and a context menu will appear, click on "create folder" and a new folder will be created under "levels", name this folder as "tut"
3. Now select the new folder called "tut" and go to the button that says "import object" as shown in the picture below. Then a browse window will appear, select the "tut.obj" file that you see there, it should be the only one that is there in the X:\Import folder and click on "open". You will now see the word "tut" in that new folder you created before. And that shows that you have added a new object to that folder, and that object is the level you made in Maya 8.5.
4. Now click on the check box that says "preview" and your level will appear in the background in the main window. Doesn't that just make you feel good But you may notice that one of the walls looks like it is missing, that is OK, because in Maya 8.5 we said the walls were only one sided, so if you move the camera inside the box later on, and look around, you'll see that all four walls are still there..but you just can't see them from one side.
5. Now this is optional, but if you want to make a thumbnail for your picture, you can click on the button that says "Make thumbnail" which I surely don't need to show a picture of, it's in that same Object Library window.
6. Close the "object library" window. You will notice that your level is now gone! Oh no...well, you only wanted to preview it after all. So how do you get your level back? Simple, go to the right side of the interface and down the bottom you will see a little area called "objects" with some expandable parts in it which are called "Detail", "levels", "props" and "trees"....sound familiar? Click on "Levels" to expand the tree, and you may or may not see "tut" on the list. So if you can't see it, There is a button just above that menu that says "refresh list". And you should see "tut" appear in the list. But you will need to re-expand that list again because it closes that list when you refresh. You'll notice one more arrow further up the picture pointing to "objects" make sure that this is selected or you won't see "detail", "levels", "props" and "trees" but instead see something else that is under the category that is selected. So make sure the object category is selected.
7. NOW you're wondering how on earth you get your level to show up. This is simple, first, select the "tut" object in your "tut" folder then you can press the quick key "A" for the "add" function and then click anywhere on the view port. OR you can go to the add button which looks like a little kettle or jug symbol up the very top in the toolbar which is shown in the picture below, and click anywhere in the viewport to add it.
8. Now you have clicked in your viewport, you now have your level, and you can now see this, isn't it pretty
NOW you can start adding things to your level, but first, I'll give a basic run through of the basic functions in the level editor, how to move around in it, and how to add objects to the level. Bare with me as this is hard to do without making a video tutorial, which I don't want to do in fear of everyone fainting at the sound of my ever so sexy voice..even if you are straight.
Basics of the x-ray level editor and detail/prop placement
I can't do this section in steps, but it'll more or less be instructions.
Movement in the level editor
In order to move the camera around in the editor, you'll have to use some strangely awkward controls that GSC have made.
So I'll just write the controls and in the brackets, their function.
- SHIFT Left mouse and drag (This will pan the camera, meaning it can go forward, back, left and right)
- SHIFT Right mouse and drag (This will move the camera up and down)
- SHIFT Right Mouse Left Mouse (This will allow you to look in any direction, but not move the camera forward, back, left right, up or down)
So like I said, the camera controls are a little strange.
They should have just done it like in Maya or even how it's done in valves hammer editor.
The toolbar and it's functions
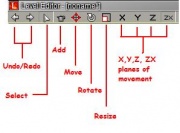
Now, I'm not going to go through all of these, but I will explain some of the basic functions shown in the below diagram.
1. Undo/Redo : These are pretty self explanatory, if you want something undone, you click undo, and vice versa.
2. Select: This is your most used tool, the select tool, used for selecting different objects. Now this won't select EVERYTHING. If you take a look over on the right hand side of the screen, there are those categories I spoke about before:
http://img242.imageshack.us/img242/5285/categoriesxf8.jpg
The select tool will only select items that fit into the selected category. So for example if I selected the "Spawn Element" category, I wouldn't be able to select things that were in another category, like a static object such as a house or a light in the light category. I would only be able to select things like spawn points, NPC's, monsters, etc.
3. Add: The add tool is self explanatory, as it is used to add stuff to your level. This is works in conjunction with the select function, so you first need to select an object from a category, and then add it to the scene by clicking the add button or by pressing "A" and clicking on the view port where you want to add the object.
4. X,Y,Z,ZX: These buttons may look a little odd, because we were all taught that X and Y were on the horizontal plane, and that Z was the vertical plane. But for some odd reason, GSC have made X and Z as the horizontal planes and Y as the vertical plane. For example, this is a comparison.
(BTW: I was never really good at maths, and it was a while ago I did maths at school with the whole XY axis thing...only in architecture we used XYZ and I did that even longer ago).
5. Rotate: When you have selected an object, you can rotate it in the axis you have selected. Experiment with different ones, as each object has a different shape and therefore a different effect when rotating. For example, our box map. If we selected it, and rotated it on the Y axis, which is the one going up and down, it would spin out map around horizontally, where as Z and X would pretty much tip our map over to either side. And well, if you select ZX with and try to rotate...nothing is going to happen for obvious reasons.
6. Uniform Scale: This changes the size of the object in whats called a uniform scale. This means that all the sides of the object will stay in the same proportion with the rest of the object. There is another scale tool called the "non-uniform scale" which I didn't show in the picture, you have to have the "uniform scale" tool selected as well as the "non-uniform scale" tool to use it.
This allows you to select an axis to scale with. So if I wanted to scale for example, a gas canister that I've placed into the level and make it really tall, I would scale it on the Y axis, but the length and width would remain the same, so to change the length or width, you would use either the X or Z axis', however if you wanted to change both at the same time and keep them uniform, then you would select the XZ axis.
That is about it for those. There are more buttons that I haven't used yet, which I think I know what they do, but I don't want to give false misleading information, and it isn't important at this stage anyway, when we need to use it a button, I will cover the use of it.
Different view types
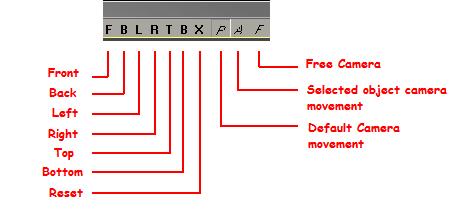
Just like the above section, I will start by showing a picture of the buttons.
1. F, B, L, R, T, B, X: These are the different preset camera POSITIONS, these will work off your current camera position, so if you are above a level and press top, you will see the level below you, however if you press bottom, you won't see the bottom of the level, you will see the sky. So it's best to just not worry about these things. I am sure that later on they may become more useful however.
- F = Front
- B = Back
- L = Left
- R = Right
- T = Top
- B = Bottom
- X = Default/Reset
2. P, A, F: These buttons change the camera TYPE.
P is your default camera movement type:
- SHIFT Left mouse and drag (This will pan the camera, meaning it can go forward, back, left and right)
- SHIFT Right mouse and drag (This will move the camera up and down)
- SHIFT Right Mouse Left Mouse (This will allow you to look in any direction, but not move the camera forward, back, left right, up or down)
A is some stupid type of camera movement, all it does is zoom away from your current camera position, and look around from your current camera position.
- SHIFT Left mouse and drag (This will allow you to look in any direction, but not move the camera forward, back, left right, up or down)
- SHIFT Right mouse and drag (This will zoom the camera in and out, move the mouse left or right for smoother zoom. You can't zoom in from the spot however, you need to zoom out first..it's weird)
- SHIFT Right Mouse Left Mouse (This does the same as holding your left mouse only)
F is a freelook mode.
- SHIFT Left mouse (This will slowly move your camera forward in the direction you aim at, so you can use your mouse to move forward and aim in the direction you want to move)
- SHIFT Right mouse (This does the same as above, only it moves backwards)
- SHIFT Right Mouse Left Mouse (This will allow you to look in any direction, but not move the camera forward, back, left right, up or down)
And that is all you need to know about the toolbar, now, for adding something to the level and using some of the tools.
Adding and manipulating objects
Alright, we're going to add a bunch of barrels to our level, and a box. We are going to use the move, rotate and scale tools.
1. Go over to the objects list on the side, where you selected the level from before, and expand the "props" tree, expand "objects" then expand "Baton" and highlight "baton_01"
2. Click the add button, or press A and click on the ground of your box map (Put it in a corner for now), or the wall if you want a barrel to be on the wall.
3. Now you know how to add an object, select baton_02 and kanistra and place them in the same area of the map.
4. Also look in the "props" > "objects" > "army" tree and search for "prop_army_base_14" and add that to your level, put it in another corner. For example, you may have done it the same way as me and will see something like this.
5. Click on the select tool if you can't select anything yet, and click on one of the objects, now cick on the "move" tool which is the button that shows the 4 little arrows, and select the box, now you can move the box around, and if you wish to move the box along an axis, you have to select X, Y, Z, or XZ. so experiment with moving the objects around. There are some snap tools that you can use, but I havent experimented with them enough to explain their uses and differences just yet, all I can say is that one of the tools the "Moving Snap to Object Toggle" tool could come in handy when you want to get an object and snap it to a surface, so instead of doing fine tuned adjustments to make it look like an objects is resting on a surface, you can use this tool to snap your object to another object for the same effect. So if you want, try and move one of the canisters and put it on top of the box like shown here. A much easier way to put objects on other objects is simply to click on top of another object when you are clicking to add an object.
6. Now you should have a little object that was called "Kanistra" it is a Jerry can. Lets make it bigger, just because we can. So click on the "uniform scale" tool and drag it out so it's a little bigger, about the same size as the box. I have made it this big: (I have added another kanistra here just to show the comparison in size from the default)
7. Now, you are going to use the rotate tool, and turn the Kanistra (I'll call it "Canister" from now on) on it's side, by selecting the Z axis (Unless you've rotated the Kanitra before, this is the right axis to use), but before we go to rotate it, there is a handy little tool called the "angle snap" tool, and if you look at the tool bar there are some red magnet looking buttons, click on the one that has a curved black line coming off the magnet. Or hover your mouse over each one until you find the one that says "Angle Snap Toggle" and click on it.
Now rotate your Canister on the Z axis and the canister will snap to what looks like 10 degree angles, so eventually it will snap to 90 degrees which is what you want it for this tutorial as we are only laying the canister on a flat surface. Rotate it until it looks flat, which should be easy to see as the Canister has a dirty black line going down the middle of it and it will be in line with the ground.
9. Now the Canister is half way in the ground, so we need to use the move tool again, so click on the move tool, and using that "Moving Snap to Object toggle" tool I was talking about before, click on the Y axis and drag the canister up out of the ground, then move it back down so that it snaps to the ground.
Now you can move the canister in the XZ axis up up to the box, and rotate it with the X axis like I have done in the picture if you like.
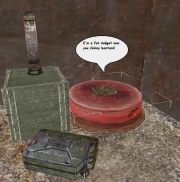
10. Now you are going to make a stupidly short and really fat object. So select the last object that is left to manipulate ("Baton_02" ). Now click on the scale tool, and then the "non uniform scale" tool. Then click on Y axis, make the canister half the height of the box. Like this:
11. Lastly, we need to make our midget baton_02 into a fat midget. So in order to do this, we simply just have to click on XZ and scale him outwards so he becomes a short fat midget like this one:

